

Our charter of duties: Saving Planet Earth
Let us admit that we have been the biggest destroyers of our earth.
Whereas we can always debate about the responsibilities being shared, owned, disowned and so on, this is the time we must discuss how ‘I’ as individual can take action to revive what is already damaged, and how can we stop further deterioration. My actions, my responsibility.
It starts with efforts to decarbonizing our plates and supporting regenerative soil.
1. The “Plate to Planet” Strategy
What you eat determines how much you add to the green house gases.
- The Power of Millets: Our old scriptures are full of this wisdom. Transitioning from polished rice to millets (Bajra, Jowar, Ragi) is a climate superpower. Rice paddies are a major source of methane. Millets require 70% less water and almost zero synthetic fertilizers, which are major sources of nitrous oxide.
- Diversify Protein: While India has a lower meat footprint than the West, we are the world’s largest dairy producer. Though we might take pride in saying this, we are also responsible to add malice to the whole system. Reducing dairy consumption or choosing “A2” milk from local breeds (which often use less intensive, low-carbon grazing) can lower methane.
- Eat Seasonal & Local: Our ‘shastras’ have always advised to eat what is grown around us. “Food miles” add up. Buying a mango in December means it likely travelled across oceans. Stick to what grows in your state during the current season. We have always believed to grow our food in the backyard.
2. Support the “Carbon-Credit” Farmer
While many of us remain unaware, as of 2026, India has launched the Rs 20,000 crore Carbon Credit Programme. You can help this succeed:
- Buy from FPOs: Look for Farmer Producer Organizations (FPOs) that label their produce as “Natural Farming” or “Prakritik Kheti.” These farmers avoid chemical fertilizers (derived from fossil fuels) and practice “No-Till” farming, which keeps carbon trapped in the soil rather than releasing it into the air.
- The “Gutli” Approach: Support initiatives that focus on agroforestry. Buying fruits from farmers who integrate trees into their crop fields (like Poplar or Mango) ensures that carbon is being actively “sucked” out of the air and stored in wood. It may be easier said than done, but yes, that is one of the ways.
3. Zero-Waste Circularity
When food ends up in a landfill, it rots and releases methane—a gas 25 times more potent than CO_2 at trapping heat.
- Home Composting: Turn your kitchen scraps into “Black Gold.” Use this compost for your balcony plants. This prevents waste from reaching landfills and reduces the need for chemical fertilizers in your own garden.
- The “Ugly” Veggie Rule: Don’t reject slightly bruised or oddly shaped vegetables at the market. These are often thrown away by vendors, wasting the energy and water used to grow them.
Short-Term Goals: Your 6-Month Roadmap
If you want to start today, here is a checklist of activities to save the planet, ranging from immediate to medium-term.
| Timeframe | Action Item | Impact |
| Week 1 | The Millet Switch: Replace one meal of rice/wheat per day with a millet. | Saves ~500 liters of water and reduces methane demand. |
| Month 1 | Start a Compost Bin: Use a simple terracotta pot or a DIY bin for fruit/veg peels. | Diverts ~10kg of waste from landfills monthly. |
| Month 2 | Energy Audit: Switch all home bulbs to LED and set your AC to a steady 24°C-26°C. Do not overload your ACs, fridges, etc. | Directly cuts electricity-based CO_2 emissions. |
| Month 3 | Sustainable Commute: Commit to using public transport (Metro/Bus) or cycling for trips <3km. (This is also in line with what our PM has recently advised) | Significant reduction in personal tailpipe emissions. |
| Month 6 | The Solar Shift: If you have a rooftop, explore the government’s 2026 subsidies for solar panels. | Transitions your home to a “Net Zero” energy source. |
(article written with the help of AI)

Gardening in the month of May
May has arrived and the days are getting warmer and longer. Summer is here , plant out summer flowers and get planning for autumn.
There are plenty of flowers and vegetables to sow and grown in May. If you had sowed seeds of summer flowers they will be ready to flower. Keep on checking for spidery mildew and bugs on zinnias Kochia, gomphrena, sunflowers, Rudbeckia etc.
Look after your finished spring bulbs for next year. Once they’ve gone over, resist the temptation to cut back the foliage. Instead, let it die and break down on its own and add liquid fertiliser all around the clumps. This will give you an even better display next spring.
If you have raised hedge plants in March, clip them to develop side shoots. Water them deeply.
Complete the making /developing new lawns during this month so that it develops nicely in monsoons.
A surface mulching of coarse leaf mould to trees and shrubs will reduce the quantity of water required and maintain a more equable supply of moisture at the roots.
Young trees should be copiously watered along with light sprinkling every day. Besides watering, the surface should be regularly turned.
Optimise your watering regime — watering early and late to get the most out of your water — and start collecting and recycling water whenever possible.
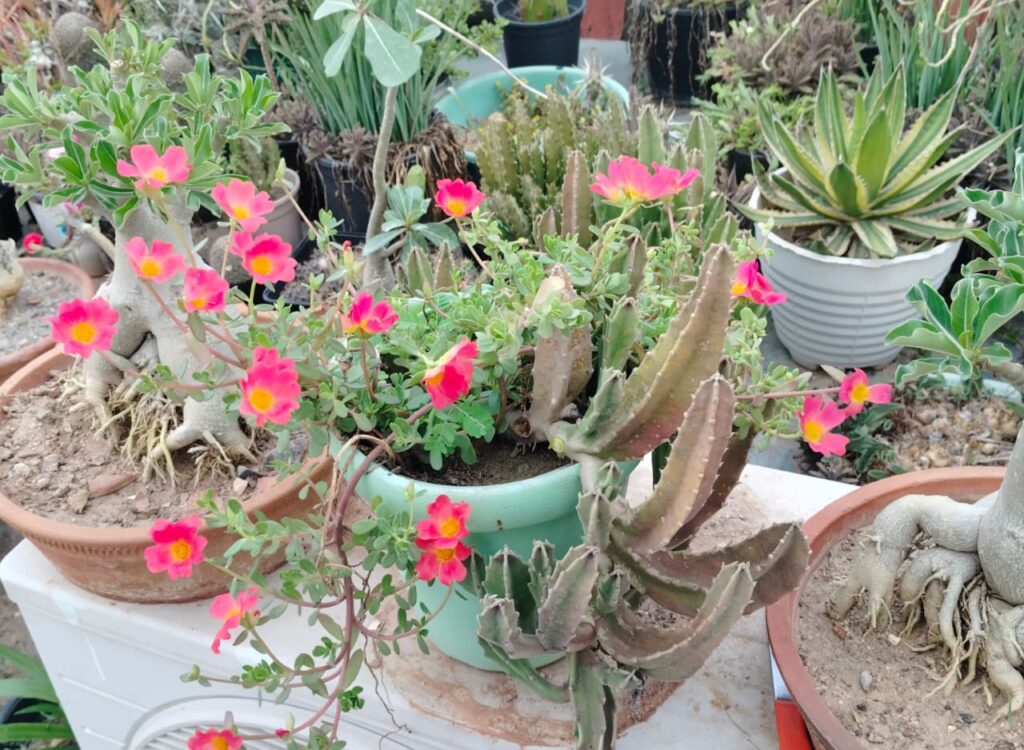
Harden off half-hardy plants before you plant in containers or beds.You can still plant. Make Summers hanging baskets with purslane, portulaca, adding good-quality compost, slow-release fertiliser , to keep them in top condition.
You can try making a few DIY bottles ,pipes with purslane and portulaca.
Hang pheromone traps in from May to August to monitor plum-fruit-moth activity.
How to prevent pests in Indoor plants?
- Hang pheromone traps in apple trees to reduce codling moth. Pheromone traps are good for all cucurbit crops like cucumber, lauki, melon, karela etc.
- Keep young fruit trees well watered while they are putting on rapid growth.
- Remove blossom and fruits from newly planted fruit trees to help them establish properly during their first year.
- Erect garden netting around soft fruit plants to prevent birds eating your crop.
- Pepper, Brinjal Okra, tomatoes, Chilli can still be planted along with gourds and peanuts.
Looking after your lawn in May
Feed your lawn with a high-nitrogen fertiliser to encourage healthy green growth. Water the grass during hot weather — that’s particularly important for newly seeded or turfed lawns. Never allow new lawns to dry out.
Seeds of monsoon flowering Annuals can be sown . Like Balsam, cleome, cocks comb, mirabilis jalapa . You can try a double variety of balsam.
Plant caladium bulbs or plants to add colour in your garden .
Clear your beds of annuals, Fertilise then only plant .
Stay safe, take care and keep on gardening.
Rama Tyagi
tyagirama1@gmail.com.
🌱 Seeds That Last: Unlocking the Secret Life of Your Seed Collection
(🌱 बीजों की उम्र का रहस्य: सही संग्रह से लंबे समय तक जीवन)
By preserving seeds wisely, a gardener doesn’t just save money—she safeguards seasons to come.
सही तरीके से बीजों को सुरक्षित रखकर माली न केवल पैसा बचाता है, बल्कि आने वाले मौसमों को भी सुरक्षित करता है।
🌿 The Hidden Power Inside Every Seed
(🌿 हर बीज में छुपी शक्ति)
Every seed carries within it a silent promise—the potential to grow, nourish, and renew life. Many gardeners discard seeds too early, assuming they have expired. In truth, most seeds remain viable for years if stored properly.
हर बीज अपने अंदर एक शांत वादा लिए होता है—उगने, पोषण देने और जीवन को नया रूप देने की क्षमता। कई लोग बीजों को जल्दी फेंक देते हैं, यह सोचकर कि वे खराब हो गए हैं। जबकि सही तरीके से रखने पर अधिकांश बीज वर्षों तक जीवित रहते हैं।
🌼 How Long Do Seeds Really Last?
(🌼 बीज वास्तव में कितने समय तक जीवित रहते हैं?)
Different seeds have different lifespans depending on their nature and storage conditions.
हर बीज की उम्र उसकी प्रकृति और भंडारण के तरीके पर निर्भर करती है।
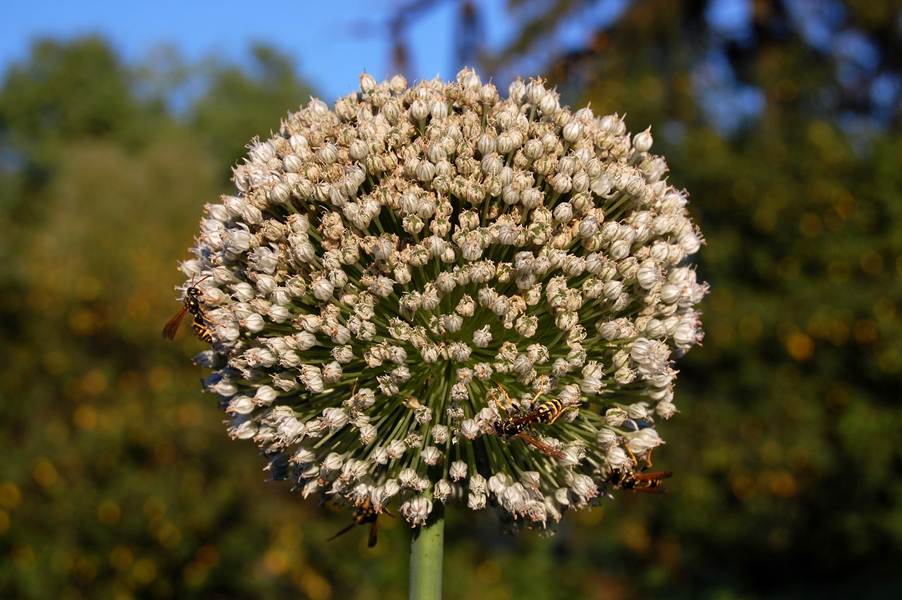
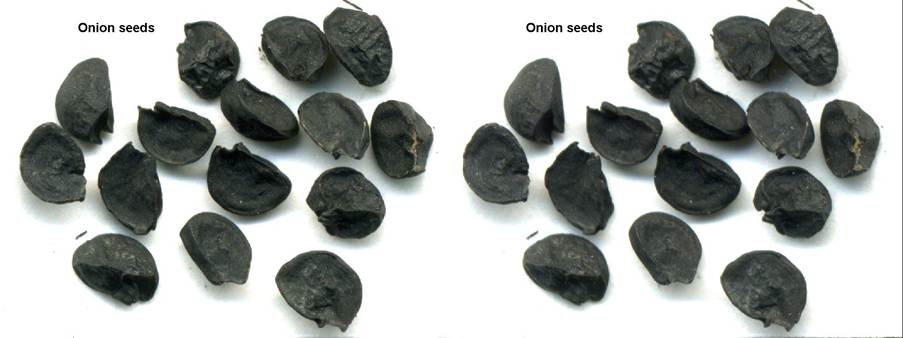
🥬 Short-Lived Seeds (2–4 Years)
🥬 कम अवधि वाले बीज (2–4 वर्ष)
Seeds like onion lose their strength quickly and should be used fresh.
प्याज के बीज जल्दी कमजोर हो जाते हैं, इसलिए इन्हें जल्दी उपयोग करना चाहिए।
🌱 Moderate Lifespan Seeds (3–6 Years)
🌱 मध्यम अवधि वाले बीज (3–6 वर्ष)
Lettuce, carrot, pea, and pepper seeds can last for several seasons if stored properly.
सलाद पत्ता, गाजर, मटर और मिर्च के बीज सही भंडारण में कई वर्षों तक चलते हैं।
🌾 Long-Lasting Seeds (5–10 Years)
🌾 लंबी अवधि वाले बीज (5–10 वर्ष)
Beans, radish, spinach, tomato, and squash are naturally durable and store well.
बीन्स, मूली, पालक, टमाटर और कद्दू के बीज लंबे समय तक सुरक्षित रहते हैं।
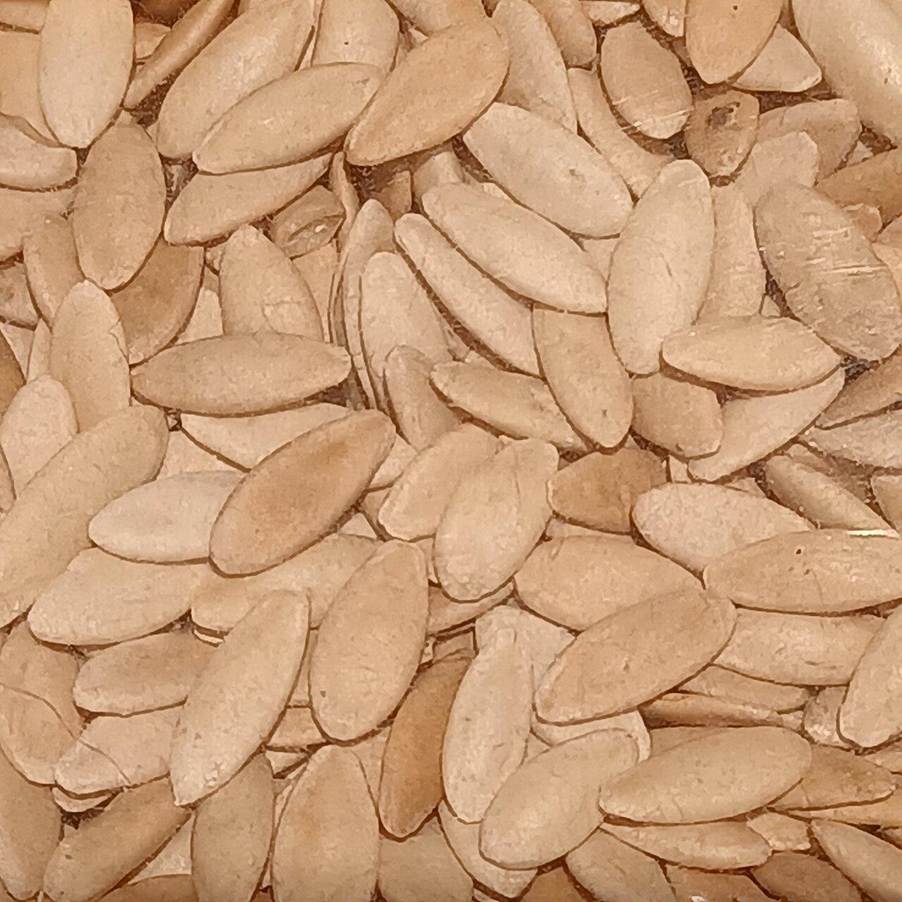
🥒 Extra Long Storage Seeds (10+ Years)
🥒 अत्यधिक लंबे समय तक चलने वाले बीज (10+ वर्ष)
Cucumber seeds are among the longest-lasting when stored correctly.
खीरे के बीज सही तरीके से रखने पर 10 साल से अधिक समय तक भी जीवित रह सकते हैं।

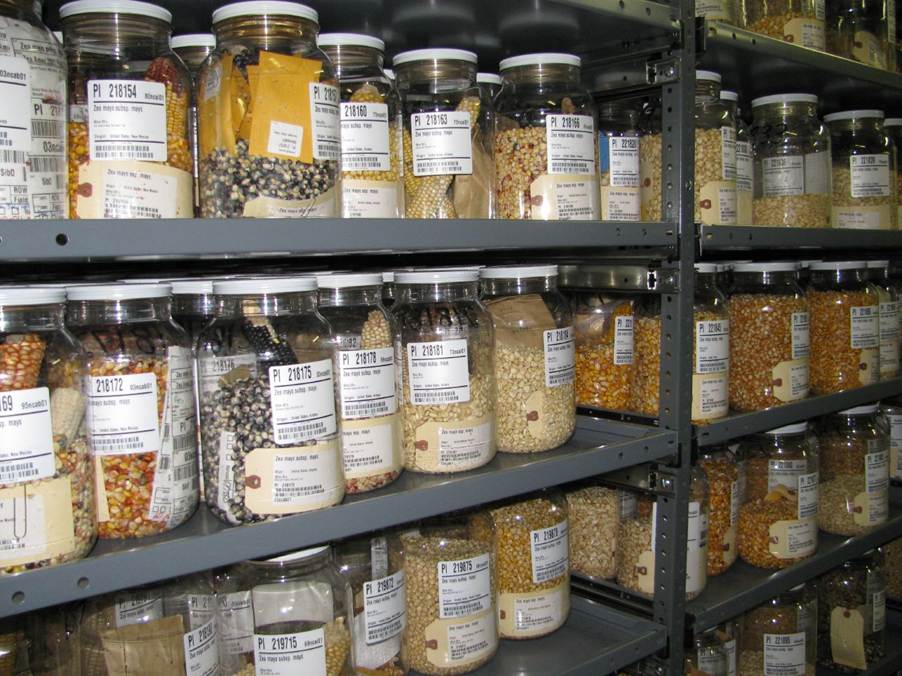
❄️ The Art of Proper Seed Storage
❄️ बीजों को सुरक्षित रखने की कला
Good storage conditions can greatly extend seed life:
सही भंडारण बीजों की उम्र को काफी बढ़ा देता है:
- Keep it Cool (ठंडा रखें): Low temperature slows aging
- Keep it Dry (सूखा रखें): Moisture damages seeds
- Keep it Dark (अंधेरा रखें): Light affects viability
- Seal it Tight (एयरटाइट रखें): Prevents humidity
- Cool + Dry + Dark = Long-lasting seeds
- ठंडा + सूखा + अंधेरा = लंबे समय तक सुरक्षित बीज
🏷️ Label and Rotate
🏷️ लेबल और उपयोग क्रम
Always label seeds with name and date. Use older seeds first to maintain high germination rates.
हमेशा बीजों पर नाम और तारीख लिखें। पुराने बीज पहले उपयोग करें ताकि अंकुरण अच्छा बना रहे।
🌡️ Test Before You Sow
🌡️ बोने से पहले परीक्षण करें
To check old seeds:
पुराने बीज जांचने का आसान तरीका:
- Place seeds on a moist paper towel
- Keep them warm
- Check germination
- If most seeds sprout, they are still good.
- अगर अधिकांश बीज अंकुरित हो जाएं, तो वे अभी भी उपयोग योग्य हैं।
🌍 Why Seed Saving Matters
🌍 बीज बचाना क्यों जरूरी है
- Saves money (पैसा बचाता है)
- Reduces waste (अपशिष्ट कम करता है)
- Preserves local varieties (स्थानीय किस्मों को बचाता है)
- Encourages self-reliance (आत्मनिर्भरता बढ़ाता है)
🌿 Final Thought | अंतिम संदेश
A well-preserved seed is not just storage—it is a future garden waiting to grow.
एक सुरक्षित रखा गया बीज सिर्फ संग्रह नहीं, बल्कि भविष्य का बगीचा है।
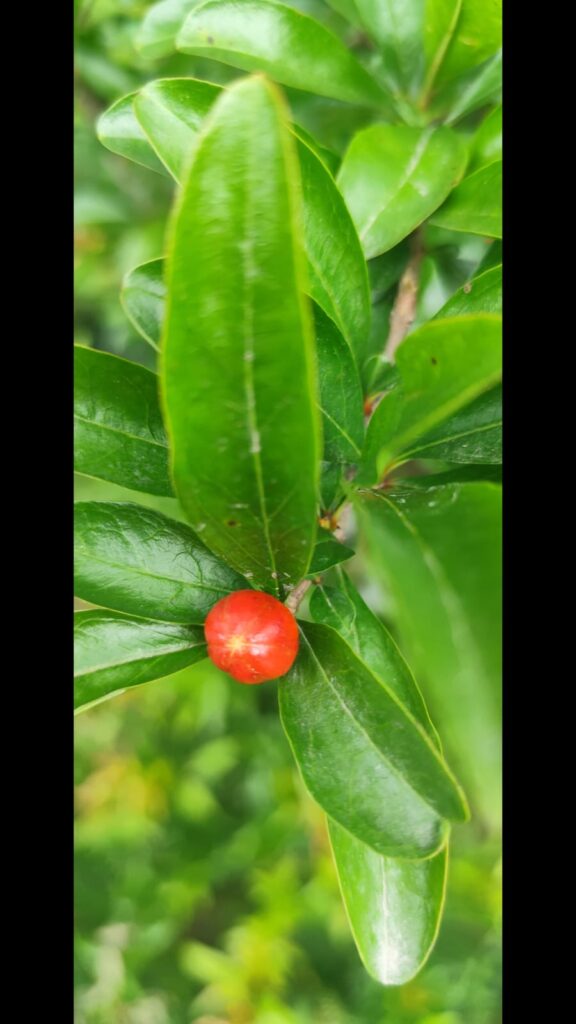
FROM THE LENSE OF OUR READERS


.jpg)
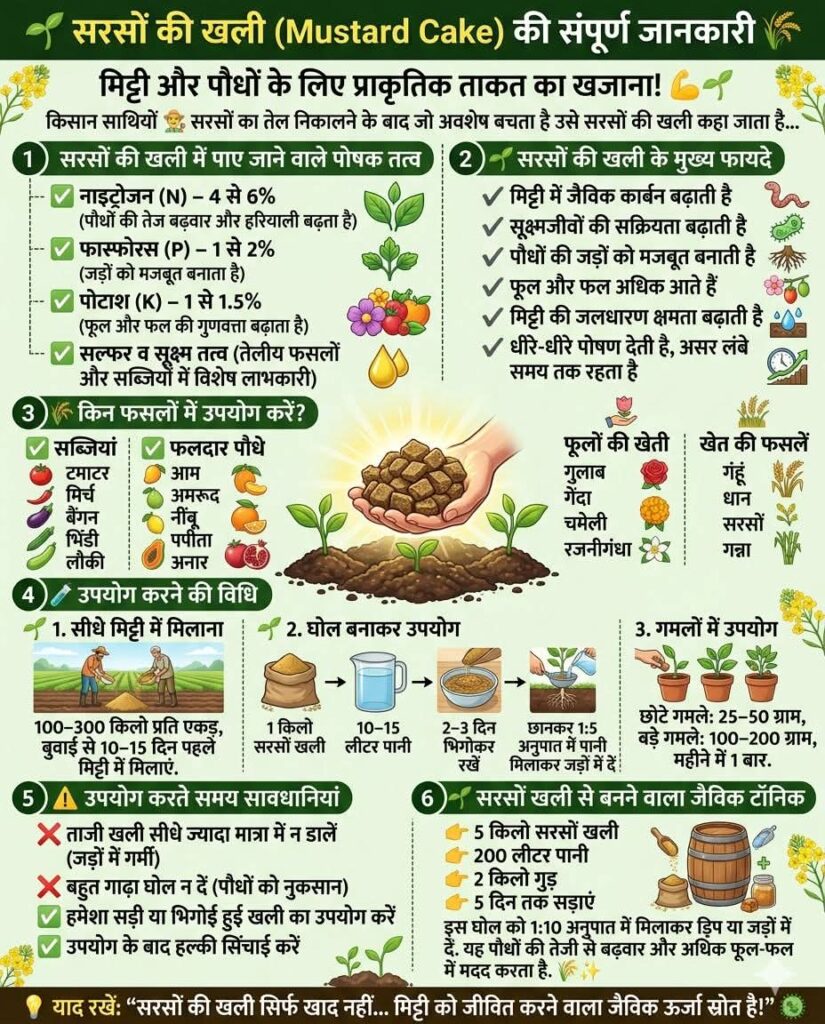
🌿 सरसों की खली (Mustard Cake) की संपूर्ण जानकारी 🌾
मिट्टी और पौधों के लिए प्राकृतिक ताकत का खजाना! 💪🌱
किसान साथियों 👨🌾
सरसों का तेल निकालने के बाद जो अवशेष बचता है उसे सरसों की खली कहा जाता है। यह एक बेहतरीन जैविक खाद है, जिसमें नाइट्रोजन, फास्फोरस, पोटाश और सूक्ष्म पोषक तत्व भरपूर मात्रा में पाए जाते हैं।
यह मिट्टी की उर्वरता बढ़ाने, पौधों की बढ़वार सुधारने और उत्पादन बढ़ाने में बहुत उपयोगी है। 🌿
━━━━━━━━━━━━━━━
🌱 सरसों की खली में पाए जाने वाले पोषक तत्व ━━━━━━━━━━━━━━━
✅ नाइट्रोजन (N) – 4 से 6%
👉 पौधों की तेज बढ़वार और हरियाली बढ़ाता है
✅ फास्फोरस (P) – 1 से 2%
👉 जड़ों को मजबूत बनाता है
✅ पोटाश (K) – 1 से 1.5%
👉 फूल और फल की गुणवत्ता बढ़ाता है
✅ सल्फर व सूक्ष्म तत्व
👉 तेलीय फसलों और सब्जियों में विशेष लाभकारी
━━━━━━━━━━━━━━━
🌿 सरसों की खली के मुख्य फायदे ━━━━━━━━━━━━━━━
✔️ मिट्टी में जैविक कार्बन बढ़ाती है
✔️ सूक्ष्मजीवों की सक्रियता बढ़ाती है
✔️ पौधों की जड़ों को मजबूत बनाती है
✔️ फूल और फल अधिक आते हैं
✔️ मिट्टी की जलधारण क्षमता बढ़ाती है
✔️ धीरे-धीरे पोषण देती है, इसलिए असर लंबे समय तक रहता है
━━━━━━━━━━━━━━━
🌾 किन फसलों में उपयोग करें? ━━━━━━━━━━━━━━━
✅ सब्जियां
टमाटर, मिर्च, बैंगन, भिंडी, लौकी आदि
✅ फलदार पौधे
आम, अमरूद, नींबू, पपीता, अनार आदि
✅ फूलों की खेती
गुलाब, गेंदा, चमेली, रजनीगंधा
✅ खेत की फसलें
गेहूं, धान, सरसों, गन्ना आदि
🧪 उपयोग करने की विधि
🌱 1. सीधे मिट्टी में मिलाना
👉 100–300 किलो प्रति एकड़
👉 बुवाई से 10–15 दिन पहले मिट्टी में मिलाएं
🌱 2. घोल बनाकर उपयोग
📦 सामग्री: ✔️ 1 किलो सरसों खली
✔️ 10–15 लीटर पानी
➡️ 2–3 दिन भिगोकर रखें
➡️ फिर छानकर 1:5 अनुपात में पानी मिलाकर जड़ों में दें
🌱 3. गमलों में उपयोग
👉 छोटे गमले: 25–50 ग्राम
👉 बड़े गमले: 100–200 ग्राम
👉 महीने में 1 बार
⚠️ उपयोग करते समय सावधानियां
❌ ताजी खली सीधे ज्यादा मात्रा में न डालें
👉 इससे जड़ों में गर्मी बन सकती है
❌ बहुत गाढ़ा घोल न दें
👉 पौधों को नुकसान हो सकता है
✅ हमेशा सड़ी या भिगोई हुई खली का उपयोग करें
✅ उपयोग के बाद हल्की सिंचाई करे
🌿 सरसों खली से बनने वाला जैविक टॉनिक
👉 5 किलो सरसों खली
👉 200 लीटर पानी
👉 2 किलो गुड़
👉 5 दिन तक सड़ाएं
इस घोल को 1:10 अनुपात में मिलाकर ड्रिप या जड़ों में दें।
यह पौधों की तेजी से बढ़वार और अधिक फूल-फल में मदद करता है। 🌾✨
💡 याद रखें: “सरसों की खली सिर्फ खाद नहीं…
मिट्टी को जीवित करने वाला जैविक ऊर्जा स्रोत है!
मक्का (मकई) की फसल के मुख्य कीट एवं नुकसान
🌱पत्तियों, जड़ों और भुट्टों को प्रभावित करने वाले प्रमुख कीट 👇
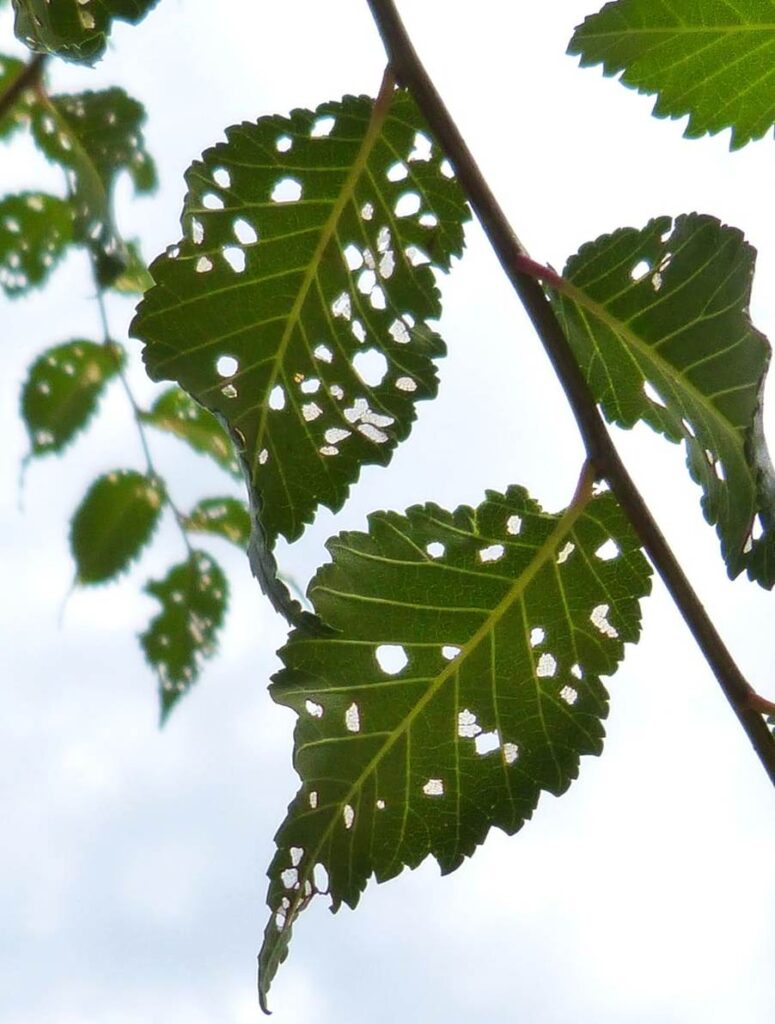
1️⃣ मक्का पत्ती भूग (Diabrotica sp.)
👉 नुकसानः पत्तियों को खाकर छेद कर देता है, जिससे प्रकाश संश्लेषण कम होता है।
2️⃣ थ्रिप्स (Frankliniella sp.)
👉 नुकसानः पत्तियों और कोमल भागों से रस चूसता है, पत्तियों पर सिल्वर जैसे धब्बे बनाता है।
3️⃣ जड़ भंग लार्वा (Phyllophaga sp.)
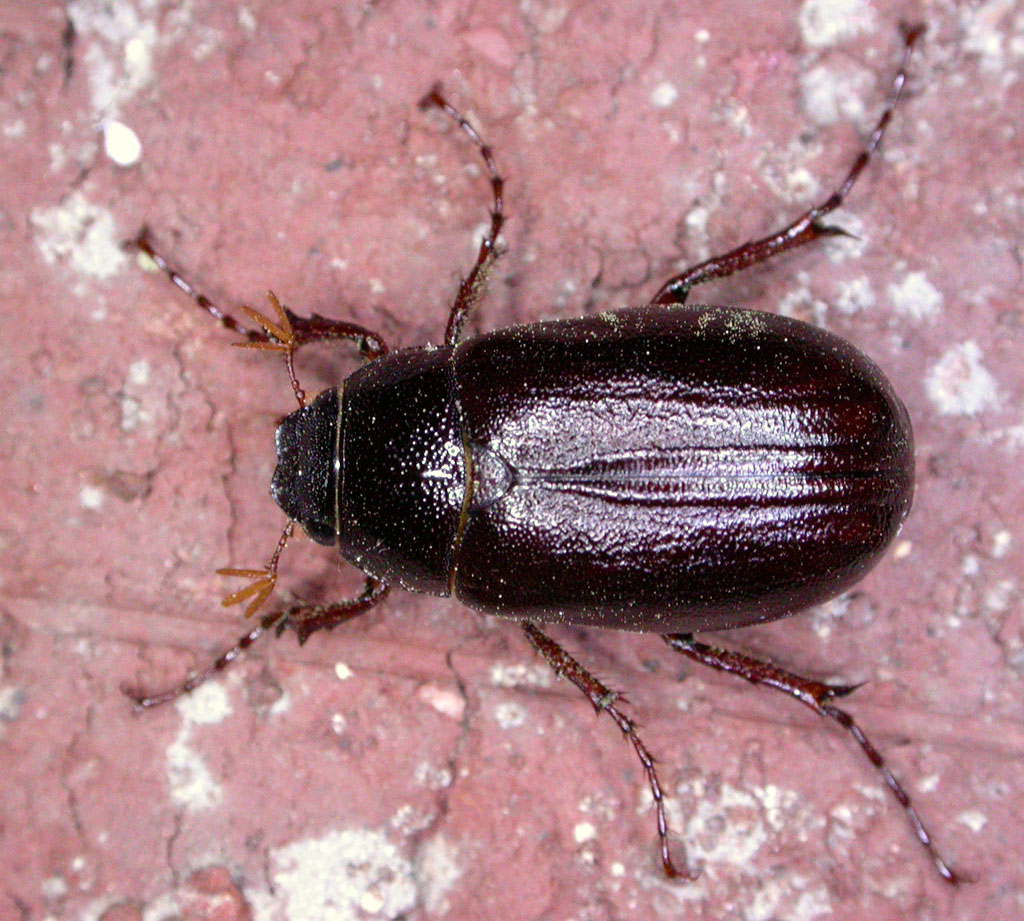
👉 नुकसानः जड़ों को खाकर पौधे को कमजोर करता है, पौधा सूख सकता है।
4️⃣ लाल मकड़ी (Tetranychus sp.)
👉 नुकसानः पत्तियों का रस चूसती है, जिससे पत्तियों पीली होकर सूख सकती हैं
5️⃣ फॉल आर्मीवर्म (Spodoptera frugiperda)
👉नुकसानः पत्तियों और भुट्टों को खाता है, पत्तियों में बड़े-बड़े छेद कर देता है।
6️⃣ तना छेदक इल्ली (Chilo partellus)
_-_Spotted_Stemborer%2fChpartellus_adult2.jpg&ehk=cKcjlD6WVu2scvQqtFArMekjQ3YYKFkehaF%2fUM%2fn6X4%3d&risl=&pid=ImgRaw&r=0)
👉 नुकसानः तने में छेद कर अंदर खाती है, जिससे पौधा टूट सकता है और भुट्टों नहीं बनता।
7️⃣ चूहा (Rattus spp.)
👉 नुकसानः बीज और कोमल पौधों को खाता है, जिससे फसल की कमी हो जाती है।
8️⃣ पक्षी (विभिन्न प्रजातियों)
👉नुकसानः अंकुरित बीज और दूधिया अवस्था के दानों को खाकर नुकसान पहुंचाते हैं।
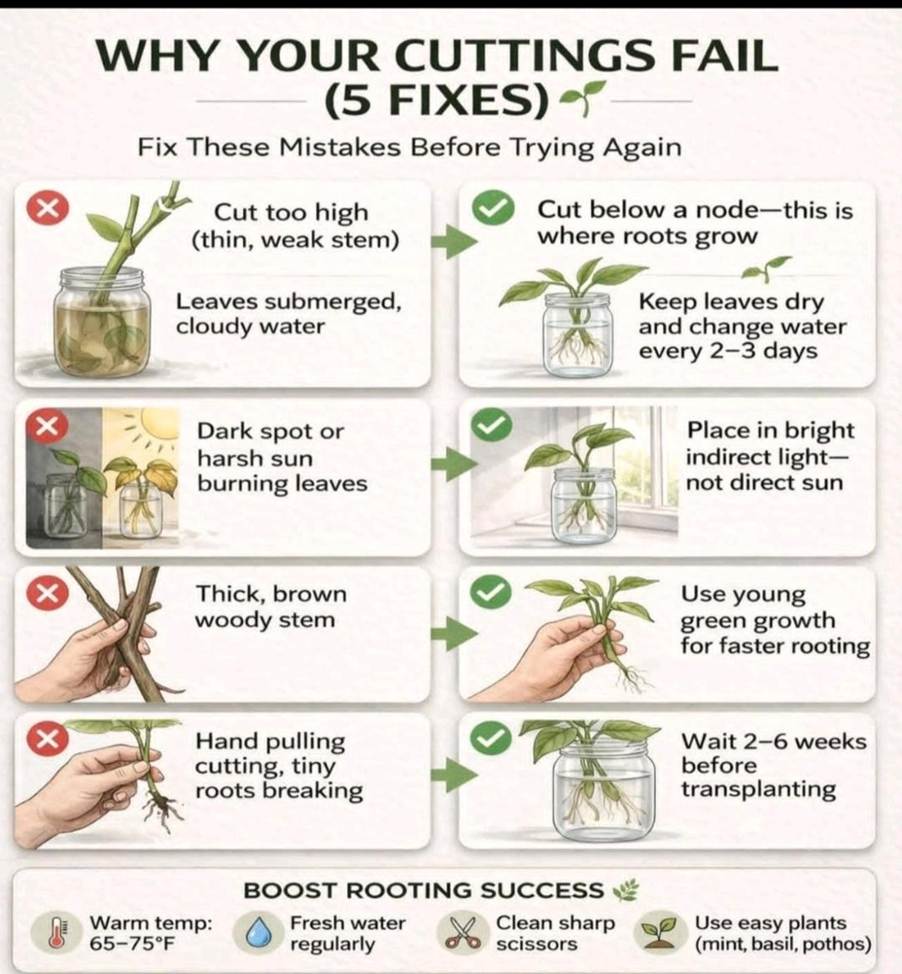
🌱 Why Plant Cuttings Fail — and How to Fix Them for Fast Rooting
Struggling with plant cuttings that just won’t grow roots? You’re not alone.
The good news is—small corrections in technique can turn most cuttings into healthy, thriving plants.
Here’s a simple, practical guide to help you succeed every time:
✂️ 1. Make the Right Cut

Always cut just below a node (the small bump where leaves grow). This is the natural point where roots develop.
Avoid thin, weak top growth—choose healthy, firm stems.
💧 2. Keep Water Clean & Leaves Dry
Do not submerge leaves in water. This leads to rotting and fungal growth.
Keep only the stem in water and change the water every 2–3 days.
☀️ 3. Provide Proper Light
- Place cuttings in bright, indirect sunlight.
- Too much direct sun can burn leaves, while low light slows root formation.
🌿 4. Choose Soft, Green Growth
- Young, flexible green stems root much faster than thick, woody ones.
- Always select fresh, actively growing shoots for best results.
⏳ 5. Be Gentle & Patient
- Do not pull cuttings to check roots—this damages delicate new growth.
- Wait 2–6 weeks before transplanting, once roots are strong and visible.
🌱 Tips to Boost Rooting Success
- ✔ Maintain a warm environment (around 18–24°C)
- ✔ Use clean, sharp scissors or pruning tools
- ✔ Refresh water regularly
- ✔ Start with easy plants like mint, basil, or pothos
With the right method and a little patience, plant propagation becomes easy and highly rewarding. 🌿
Happy Gardening
Rama Tyagi
tyagirama1 @gmail.com
🌱 Summer Plant Diseases: Identification & Management
🌿 गर्मियों में पौधों की बीमारियाँ: पहचान और नियंत्रण
☀️ Introduction | परिचय
Summer promotes rapid plant growth, but it also increases the risk of fungal and bacterial diseases. सही पहचान ही सही उपचार की कुंजी है—early diagnosis helps prevent major crop loss.
गर्मियों में पौधे तेजी से बढ़ते हैं, लेकिन इस मौसम में फफूंदी और बैक्टीरिया जनित रोगों का खतरा भी बढ़ जाता है। सही पहचान ही सही इलाज की कुंजी है—समय पर पहचान से नुकसान रोका जा सकता है।
🔍 Common Summer Diseases | मुख्य ग्रीष्मकालीन रोग
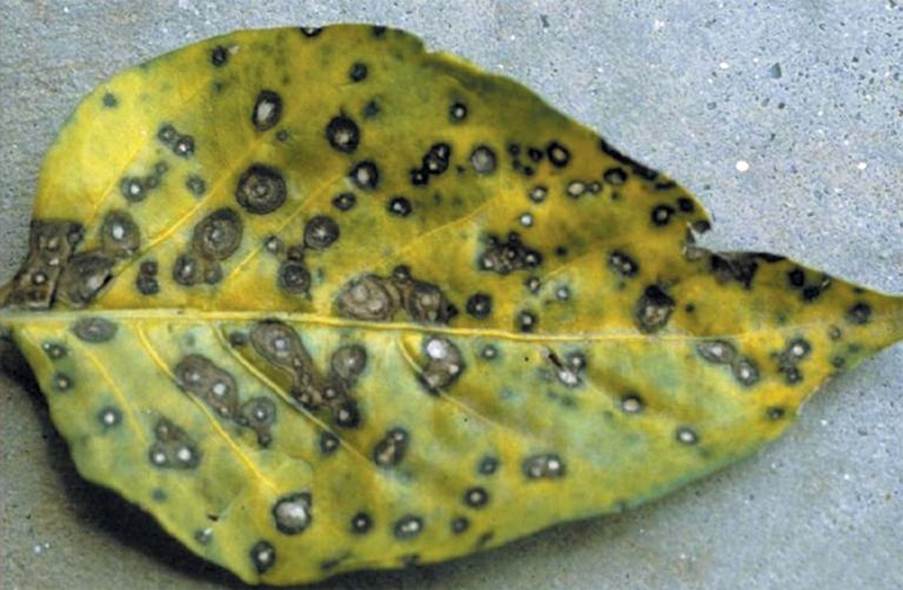
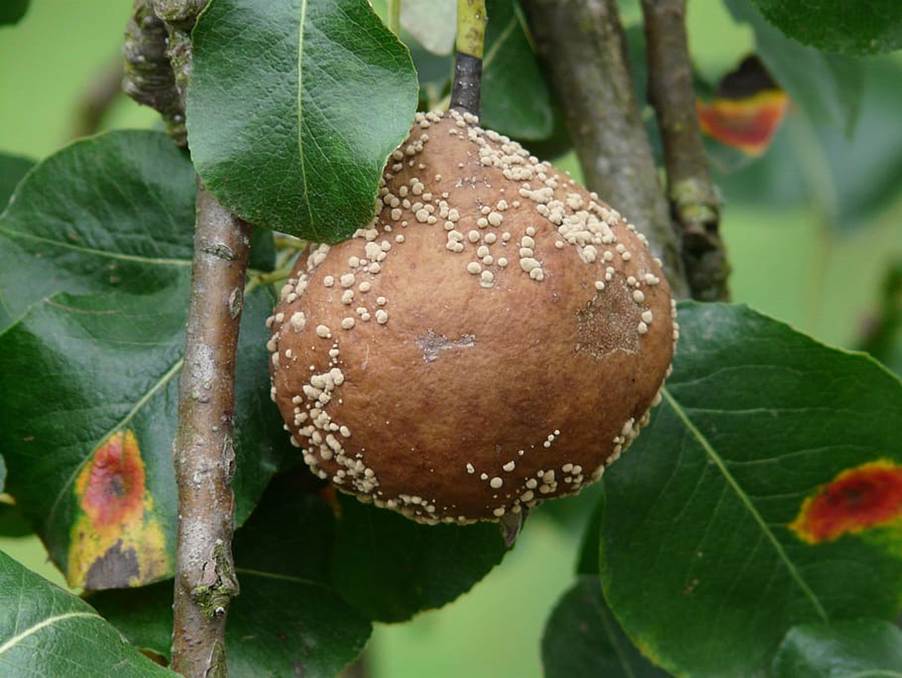
1. Anthracnose (एन्थ्रेक्नोज)

Dark, sunken spots on leaves, stems, and fruits.
पत्तियों, तनों और फलों पर काले धंसे हुए धब्बे
2. Downy Mildew (डाउनी मिल्ड्यू)
Yellow patches on upper surface, grey fungal growth underneath.
ऊपर पीले धब्बे, नीचे ग्रे फफूंदी की परत
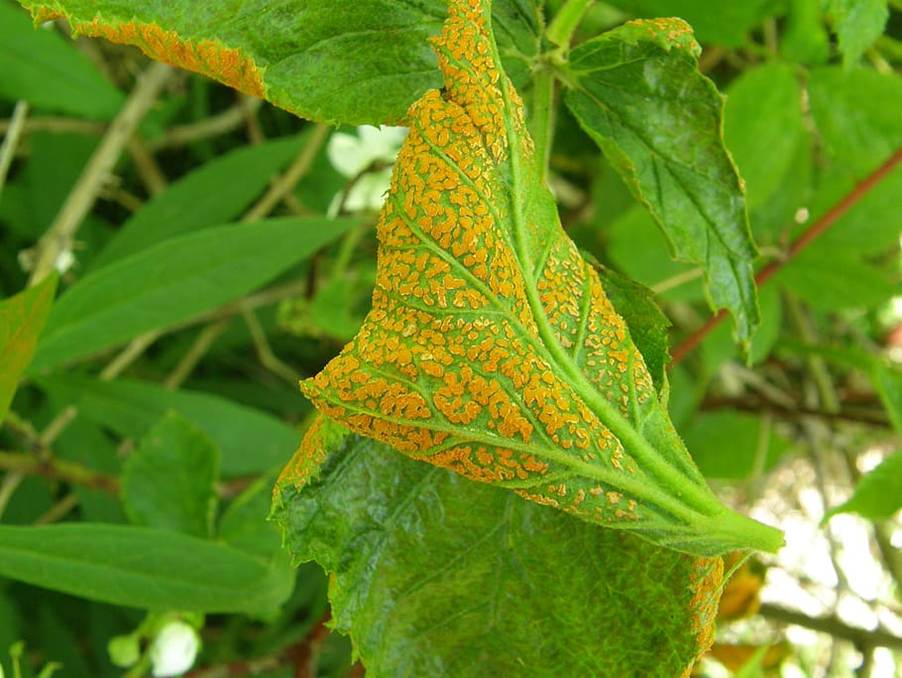
3. Rust (रस्ट रोग)
Orange/brown powdery pustules on leaves
पत्तियों पर नारंगी/भूरे दाने
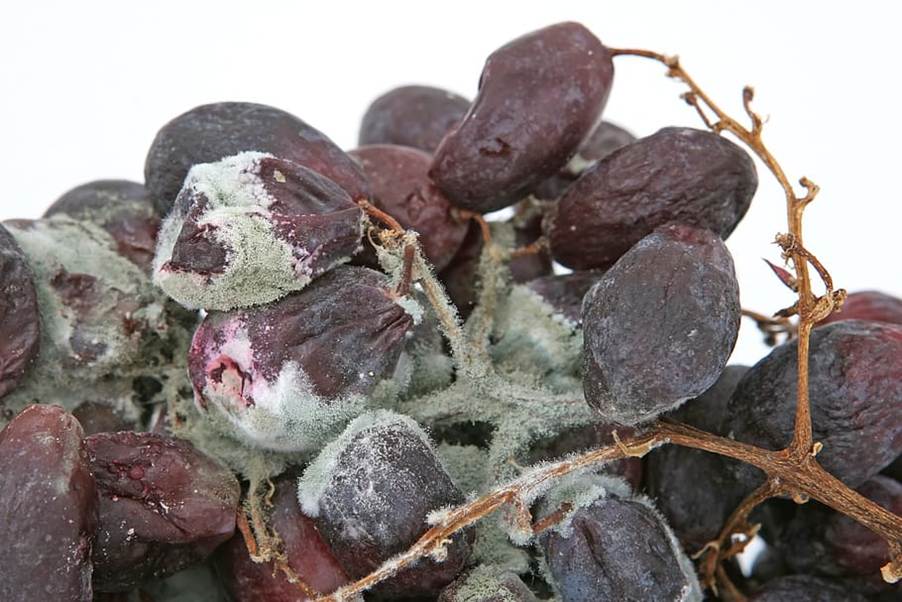
4. Botrytis / Grey Mold (बोट्राइटिस / ग्रे फफूंदी)
Soft rot with grey fungal coating
नरम सड़न के साथ ग्रे फफूंदी
⚠️ Why These Diseases Occur | ये रोग क्यों होते हैं
English:
- High humidity (गर्मी + नमी)
- Poor air circulation
- Overwatering / water stagnation
- Dense planting
- अधिक नमी और गर्मी
- हवा का कम संचार
- अधिक पानी या पानी का रुकना
- बहुत घनी रोपाई
💊 Effective Treatment Strategy | प्रभावी उपचार रणनीति
✅ 1. Early Detection (समय पर पहचान)
Regular inspection helps control disease at an early stage
नियमित निरीक्षण से रोग शुरुआती अवस्था में ही रोका जा सकता है
✂️ 2. Remove Infected Parts (संक्रमित भाग हटाएँ)
Prune affected leaves/fruits and destroy them away from plants
संक्रमित पत्तियाँ/फल काटकर दूर नष्ट करें
🌿 3. Improve Growing Conditions (खेती प्रबंधन सुधारें)
Maintain spacing, avoid waterlogging, ensure airflow
उचित दूरी रखें, जलभराव से बचें, हवा का संचार बढ़ाएँ
🧪 4. Use Right Fungicides (उचित दवा का प्रयोग)
Preventive: Copper-based fungicides
Curative: Systemic fungicides (as per crop)
Organic: Neem oil, bio-fungicides (Trichoderma, etc.)
रोकथाम: कॉपर आधारित फफूंदनाशक
उपचार: प्रणालीगत दवाएँ (फसल अनुसार)
जैविक: नीम तेल, ट्राइकोडर्मा जैसे बायो-फफूंदनाशक
💧 5. Balanced Nutrition (संतुलित पोषण)
Healthy plants resist diseases better—use proper NPK and micronutrients
स्वस्थ पौधे रोगों से बेहतर लड़ते हैं—संतुलित NPK और सूक्ष्म पोषक तत्व दें
📊 6. Continuous Monitoring (निरंतर निगरानी)
Track disease progress and adjust treatment accordingly
रोग की प्रगति पर नजर रखें और उपचार में बदलाव करें
🌾 Conclusion | निष्कर्ष
Healthy plants lead to higher yield and better profit. Preventive care, timely action, and good management practices are the keys to successful summer gardening.
स्वस्थ पौधे अधिक उत्पादन और बेहतर लाभ देते हैं। समय पर देखभाल, सही उपचार और अच्छे प्रबंधन से गर्मियों में भी सफल बागवानी संभव है।
Happy Gardening
Rama Tyagi
tyagirama1 @gmail.com