
From the Editor’s Desk
Hi….
Welcome to another edition of our monthly e-magazine.
I have always believed that we stop growing if we remain in cocoon of our comfort zone for too long. We tend to start taking things for granted. And then, an external force is needed to jolt us out of our slumber.
And this is exactly what has happened. We human had started taking things for granted. We thought we ruled the earth.
But whatever said and done, it is a fact that we have realised the importance of plants in our lives. And why not?
Plants provide us with oxygen; they act as Carbon sink, soaking Carbon Dioxide; they feed us, and so on. In short, our basic existence depends on the plants. It is not a surprise, then, that more and more people have started taking to gardening, in whatever small, little ways they can.
Kudos to all of you!
And from our side, we have pledged to help you sustain your efforts in this direction.
Hence, keeping with our promise, from this issue onwards, we bring you few of the articles in Hindi as well, as also desired by many of our esteemed readers.
Remember! You are an integral part of us. And we expect a feedback from you all. So, do write your comments. So that we are able to bring you the best in the gardening.
And our team joins me in wishing you all the Best in forthcoming festive season.
HAPPY GARDENING !!!!!
Group Captain Sushil Bhatia (retd)
Chief Editor
FOCAL POINTS OF LANDSCAPES ‘CAPTIVATING AN OBSERVER’
Suniti Goel
A focal point is an attractive visual entry into the garden. It is the key to captivating an observer to the landscape. It tells you where to look initially and smoothly takes you through garden. A focal point can also be used to hide or distract viewers from items you don’t want them to notice.
Focal points are not meant just for big gardens, but can also be effectively created in smaller ones. For example, a patch of green can be simple, yet perfect and attractive piece of highlighting; a place where the eye is naturally drawn. Remember, the highlighted object is to lead the eye to an area of particular interest. Too many focal points in a garden will create confusion and overwhelm the viewer.
What to add for a focal point?
There can be various items, which can be added for a focal point.
1) Objects: Combining objects with plants is a way to create whimsy points. Objects such as statues of Buddha, stone articles like fountains, lamp shades etc., tend to blend easily with the garden.

2) Plants: Design of Focal Point with plants is little simpler, as the plants naturally flow with the garden landscape. Plants must be perennials or annuals, grouped together to create sensational focal points. A little research on hardy specimens and colorful foliage can prove to be magical.

3) Water features: All water features pretty much work the same way. Large and medium rocks can be placed on the ground around the fountain, so they appear as natural features in the garden. Some ceramic elements like turtles, ducks, fishermen etc. can be added to depict life.
4) Hangings: Your outdoor space is incomplete without hangings. Hanging decoration can be a focal point to bring your patio to life. Painted trees, mason jars, iron buckets, bird houses, and lanterns etc. are good choices. Placing Kokedamas (literally meaning “Moss balls”) can make great and trendy choice.

5) Wood logs and tree stumps: Tall stumps are easily visible when decorated properly. Making a fire pit around the tree stumps is a great idea for focal points.
This is worth mentioning that these are just the basic guidelines. Your imagination can do wonders in your garden.
VEGETABLES YOU CAN GROW IN OCTOBER PART 2
Rama Tyagi
The crops which are sown during winter season are called Rabi crops or winter crops in India. These crops require a cold climate. The sowing time of these crops is between October to December and harvesting is done from February to April. These crops require low temperatures and less water.

During the time of Covid 19, everyone has understood the importance of organic vegetables, and that too, home grown, to boost immunity and health. The vegetables you grow yourself are organic and hence chemical free.
Here, we have made an attempt to give you an idea about winter vegetables and their sowing times, with other details.
Vegetable Sowing Calendar
1) Beetroot (Chukandar)
- Growing Season/ Sowing Time (North/South India) – October to November.
- Germination Temperature – 10-30°C.
- Sowing Method & Sowing Depth – Direct & one inch.
- Days to Maturity – 80 – 90 Days After Sowing.
2) Broccoli
- Growing Season/ Sowing Time (North/south India) – August To October.
- Germination Temperature – 21-23°C.
- Fruit Shape & Color – Green in Color, Very Compact and Uniform.
- Sowing Method & Sowing Depth – Transplant & 1.5 inches.
- Days to Maturity – 90 – 100 Days After Sowing.
3) Cabbage
- Growing Season/ Sowing Time (North India) – September to October.
- Growing Season/ Sowing Time (South India) – June to July & October to November.
- Germination Temperature – 10-20°C.
- Sowing Method & Sowing Depth – Transplant & 0.25 inch.
- Days to Maturity – 90 – 100 Days After Sowing.
4) Carrot
- Growing Season/ Sowing Time (North/south India) – August to October.
- Germination Temperature – 10-30°C.
- Sowing Method & Sowing Depth – Direct & 0.25 inch.
- Days to Maturity – 75 – 80 Days After Sowing.
5) Beans
- Growing Season/ Sowing Time – September To October (Plains), May to June (Hills).
- Germination Temperature – 16-30°C.
- Fruit Shape & Color- Extra Fine, Shining, Fiber Less, Straight.
- Sowing Method & Sowing Depth – Direct & 1-1.5 inches.
- Days to Maturity – 45 – 50 Days After Sowing
6) Lettuce
- Growing Season/ Sowing Time (North India) – September to October.
- Growing Season/ Sowing Time (South India) – October to December.
- Germination Temperature – 07-27°C.
- Fruit Shape & Color: No Head, Loose & Bright Green Frilly Leaves
- Sowing Method & Sowing Depth – Direct/Transplant & Surface Sow.
- Days to Maturity – 45 – 55 Days After Sowing.
7) Onion
- Growing Season/ Sowing Time (South India) – March to April, May to June & September to October.
- Germination Temperature – 10-32°C.
- Sowing Method & Sowing Depth – Transplant & 0.25 inch.
- Days to Maturity – 150 – 160 Days After Sowing.
8) Peas
- Growing Season/ Sowing Time: September to November.
- Germination Temperature – 10-22°C.
- Fruit Shape & Color – Very Thin, Almost Round Like Finger & Green.
- Sowing Method & Sowing Depth – Direct & 1 inch.
- Sowing Distance (inches/feet) – Seeds to Seeds – 4” & Rows to Rows – 12”.
- Days to Maturity – 55 – 60 Days After Sowing.
9) Radish
- Growing Season/ Sowing Time (North India) – August-January.
- Growing Season/ Sowing Time (South India) – Depends.
- Germination Temperature – 10-30°C.
- Sowing Method & Sowing Depth – Direct & 0.5 inch.
- Sowing Distance (inches/feet) – Seeds to Seeds – 2-3”
- Days to Maturity – 40 – 45 Days After Sowing
10) Spinach
- Growing Season/ Sowing Time (North /South India) – September-November.
- Germination Temperature – 10 – 22°C.
- Sowing Method & Sowing Depth – Direct & 0.5 inch.
- Sowing Distance (inches/feet) – Seeds to Seeds – 03”
- Days to Maturity – 60 Days after Sowing.
11) Turnip
- Growing Season/ Sowing Time (North/south India) – October to November.
- Germination Temperature – 15-35°C.
- Sowing Method & Sowing Depth – Direct & 0.5 inch.
- Sowing Distance (inches/feet) – Seeds to Seeds – 4 ft & Rows to Rows – 1.5 ft.
- Days to Maturity – 40 – 50 Days after Sowing.
12) Cauliflower (Late) & Cauliflower (Mid-season)
- Growing Season/ Sowing Time (North India) – August-September-October.
- Germination Temperature – 16-20°C.
- Fruit Shape & Color – Dome & Excellent Self Blanching Leaf Character Which Cover The
- Curd Up to 1.5 Kg Weight.
- Sowing Method & Sowing Depth – Transplant & 0.5 inch.
- Sowing Distance (inches/feet) – Seeds to Seeds – 2 ft & Rows to Rows – 2 ft.
- Days to Maturity – 120 – 125 Days after Sowing.
13) Potato
- Growing Season/ Sowing Time (North /South India) – October to December.
- Germination Temperature – 4°C.
- Fruit Shape & Color: Round and brown.
- Sowing Method & Sowing Depth – Direct & 4 inches.
- Sowing Distance (inches/feet) – Rows to Rows – 12″ to 18″.
- Days to Maturity – 70 – 120 Days after Sowing.
14) Pumpkin
- Growing Season/ Sowing Time (North India) – Jan-Mar, Sept-Dec & May-June.
- Germination Temperature – 20-35°C.
- Fruit Shape & Color: Flattish Round with Deep Ridges & Shining Dark Green In Color.
- With Yellowish Spots/Netting All Over, Flesh in Yellowish Orange.
- Sowing Method & Sowing Depth – Direct & 1 inch.
- Sowing Distance (inches/feet) – Between seeds 24″-48″.
- Days to Maturity – 70 – 75 Days after Sowing.
Besides these, there are ample of other vegetables like Celery, oregano, cilantro, coriander, Fenugreek, round radishes, Brinjal, Pok Choy, zucchini, red cabbage, Chinese cabbage, asparagus, cherry tomatoes, colored capsicum etc. which can be easily grown.
SOIL REQUIREMENTS
You can make your own soil for seed sowing, as follows.
- Cocopeat (1 part)
- Perlite or vermiculite or coarse sand (1 part)
- Compost or well-rotted manure (1 part)
Procedure: Take a container and mix all the ingredients until you get a texture similar to that of potting soil. Adding compost or manure is optional, as the seeds rely more on the moisture-retaining capability of the potting soil than the nutrition.
You can grow your seedlings in a seedling tray or in a pan. Cover the pans and trays with sheets till seeds sprout to protect them from pests, insects, rodents and birds.
Some seeds are just broadcast like Spinach, Coriander, Fenugreek, Mustard, Amaranthus Radish, Carrot, Turnip, Beet root etc.
Coriander seeds should be crushed and then soaked overnight. Rest can be made to seedlings and then transferred.
Fine seeds should be mixed with sand and then sown.
Radish, beetroot, turnip and carrots seeds should be planted singly by making holes in the soil and covered lightly.
Happy Gardening.
COMPANION GARDENING NATURE’S WAY OF CO-EXISTENCE
Shailja Mishra
Companion Gardening is planting different plants or crops in proximity for various reasons ranging from Pest control, pollination, providing habitat for beneficial insects, providing support to neighbouring plant, deter weeds, enriching soil nutrients, maximum use of space and to overall increase crop productivity. This technique is used since ages by gardeners and farmers, world-wide, to increase the overall growth of the plants.
Studies show that plants might eavesdrop or monitor their neighbour plants and the sound they hear is utilised in their own growth. According to a recent study, plants use acoustic signals to communicate with each other.
There are many combinations of companion plants for our survival garden. The most common of companion plants and the benefits they derive are as under.

Tomatoes
- Thyme and Peppermint: Deter the Whiteflies.
- Marigold: Increases the overall growth of the plant.
- Basil: Encourages better flavour.
Carrots
- Dil: A chemical produced by Dil plant helps carrots to improve its overall health and growth.
Lettuce
- Chervil: Deters amphids and snails and provides protection against mildew.
Broccoli
- Mint & Dil: Improve overall growth of the Broccoli plant.
Cabbage
- Sage and Rosemary: Deters Cabbage butterflies.
- Celery: Deters grubs.
Radish
- Beans: Both of these plants improve the overall health of each other.
Celery
- Bush Beans : Both of these plants improve the overall health of each other.
Potatoes
- Beans: Helps deter beetles which may cause fair amount of damage to potatoes.
Eggplant
- Nasturtiums: Deters insects such as various types of beetles and spider mites.
Sweetcorn
- Sunflower: Provides additional Nitrogen to the soil which improves the overall health of the sweetcorn plant to have better produce.
Beans
- Marigold and Petunias: Deter Beetles.
Grapes
- Clovers and Lupin: Improve the overall fertility of the soil to increase quality of produce.
Corn, Beans and Squashes, when planted together, can be beneficial as Corn provides structure to the Beans and Beans add additional Nitrogen to the Soil. Squash spreads on the ground and deters weeds. These are commonly named as three sisters.
Likewise, there are some bad companions too which are not recommended for survival gardening.
SEED SOWING OF WINTER FLOWERS IN OCTOBER PART 2
Rakesh Goel
October is a busy month in a garden. This is the time when seeds of winter flowering annuals, not previously sown, should be sown in this month. Sweet Pea seeds must also be sown by the 10th of the month.
Succession sowings at intervals of 10 days or a fortnight should be made of seeds of all winter flowers.
All flowering annuals required for exhibition or decorative work in pots must be potted up early this month to allow the plants to get ample time for development. The planting of annual flower beds and borders must also be completed this month so that the seedlings may be well established before the cold sets in.
Sowing of seeds of Larkspur, Linaria and Linum may be made in situ in beds and borders.

Chrysanthemums in pots will need careful treatment. Continuous pinching, disbudding, regular fertilising with liquid manure will be required.

Points to be kept in mind
- Seeds of flowering annuals for exhibition and for pots should always be purchased from the best stores .This also includes a number of varieties such as double petunias, pansies and double flowering stocks.
- The following are varieties of annuals of which you should buy fresh seeds for exhibition purposes:
Agertum
Cineraria
Godetia
Nemesia
Schizanthus
Aster
Clarkia
Linaria
Petunia
Stock
Carnations (annual flowering)
Dianthus
Nasturtium
Pansy
- Seeds of the following varieties of flowering annuals which you have saved can be planted in beds and for cut flowers.
Acroclinum
Arcotis
Calendula
Dimorphotheca
Hollyhock
Lupins
Petunia
Salvia
Verbena
Alyssum
Brachychome
Chrysanthemums
Gypsophilla
Larkspur
Marigold
Phlox
Statice
Viola
Antirrhinum
Candytuft (white)
Helichrysum
Linum
Nasturtium
Poppy
Sweet sultan
Essential points for cultivation for annuals are as follows:
(a) Provide an open sunny location; the exception is Cineraria, Salvia, Petunia and Larkspur which can grow in semi shade.
(b) Good drainage is very essential.
(c) Soil should be fed with organic manure but don’t overfeed. Overfeeding will result in excess leafy growth and less flowers.
(d) Staking is necessary for all tall plants.
(e )More frequent watering will be necessary as their roots do not go deep. Sweet peas, though, have very deep roots.
(f) Fertilise regularly.
Tip 1. Stopping of Annuals: Stopping of young plants is very important to produce more compact plant which blooms over a longer period. If you want your plants go tall then do not stop. In such cases, any growth from axils can be rubbed off.
Plants good for stopping are:
Antirrhinum, clarkia, godetia, phlox, salvia, larkspur, double stocks. Annuals for edgings. Some of the annuals suitable and popular for edgings are alyssum, ageratum, linaria, marigold, mesembryanthemum, mimulus, nasturtium, Tagetes signata pumila, stock.
Tip 2. In a border with annuals, different types of plants that bloom for longest period should be planted. The period and duration of blooming of each variety should, therefore be known. In such an arrangement, the flowers which bloom late can be planted at the back and early flowering ones in the front. Borders can be of one colour with different shades, Lighter to darker shades Or Lighter to softer colours to darker bright ones at the focal point.
Do add fragrant stocks, sweet peas or alyssum.
The foliage of plants is equally important. Plants with feathery leaves provide relief to broad-leaf plants. The shape of blooms is also an important consideration.
Transplanting Chrysanthemums
Vandna Bhattnagar
Winters are the best time to enjoy colourful blooms. Many choices are there for winter flowers like Chrysanthemum, Petunia, Larkspur, Salvia etc. But without Chrysanthemum, garden will look incomplete due to the riots of colours they give when in full bloom.

By now, your Chrysanthemum cuttings might have rooted. It is the best time to give them a final home for blooming. Yes, it is the time to transplant the rooted cuttings. When you are transplanting, keep the following points in mind:
- You can choose a 10-inch pot of either clay or plastic, but should have enough holes for excess water to escape.
- Keep broken pieces of clay pot over the holes before filling the soil.
- Prepare soil for Chrysanthemum by mixing 50 % soil and 50 % compost /vermicompost, mixed with 2 gm of any fungicide.
- After filling the soil, take out the seedlings carefully, without disturbing the roots and transplant them in the new pots at a depth just equal to that of the nursery pot from which you have taken it out.
- Keep in semi shade for 10 days.
- Remove rain waiter by tilting the pot, as and when needed, as excess water may spoil the roots.
- Pinch off the apex leaves regularly to get more shoots and more flowers. Break off 1 inch from the tip of each stem after transplanting and repeat each time the stems reach 6 to 8 inches tall. Stop pinching out in October, so the plants can start forming buds.
- Keep in full sun. It should get at least 6 hours of the sun for bright blooms.
- Fertilise after 15 days of transplanting. Use liquid manure /compost tea/mustard cake. Water every week. Spray Neem Oil to keep the insects away.
Happy planting.
THE TRUTH IS SIMPLE
Deepti Jain
Amid the COVID-19 pandemic, eating healthy food remains an important part of maintaining your health. While there are no precise foods that can defend you from the virus, there is a range of nutritious and palatable foods that can generate an immune system worthy of giving The Novel COVID -19 virus a fight.
What we eat greatly affects our health, both in short and long term. We live in an environment where we are exposed to toxins, both tangible as well as hidden and therefore, scarier. Pesticides and genetically modified organisms compromise our food; our air is polluted, and our water supply is a major source of concern. As a result, I feel rather strongly, that foods with the highest nutrient density are our best reservoir of enhancing our vitality in this rather toxic world. Among plant foods, some are especially beneficial, because they are power-packed with multiple protective nutrients.
Bell Peppers
Bell peppers have a high concentration of antioxidants. They provide a huge range of vitamins such as A, B complex E and C. The sulphur content present in the Bell Peppers is a warrior against cancer. They also help to protect our eyes from cataract and macular degeneration. They contain traces of nicotine, which in small amounts, is neuroprotective and helps lower the rate of Parkinson’s disease.
Beetroot
This red roughage, Beetroot is a heart comrade. It is very high in nitrite content that gets converted to nitric oxide which supports healthy blood flow. It can, thus, help keep our blood pressure in check. Beetroot is also rich in anti-inflammatory antioxidants betaine which helps keep our bad cholesterol level down. Beetroot helps to detox, de-stress and fight dementia.
A hangover? No problem, Beetroot can help!
Lauki
Lauki is 96% water and is inherently cooling, therefore a boon during summers. Easy to digest, it is a perfect food for summer months when our digestive system does not work at its optimum. The soluble and insoluble fibre it delivers keeps our digestion humming, thereby keeping constipation, piles and flatulence away. The best friend of our liver, it actively cuts liver inflammation.
Carrot
Carotenoids present in carrots are a fat-soluble vitamin, so they stimulate bile in the liver to flow and hasten the removal of toxins. Other benefits of carrots are that they are a good source of the difficult-to-find vitamin B8, which is known for its stress and anxiety busting properties, and for boosting your mental health and cognitive function. Carrots, a memory buzzing food, cuts brain inflammation.
Moringa
Moringa is full of vitamins and minerals with a significant quantity of vitamins A, C and E, Calcium, Manganese, Magnesium, Potassium, Phosphorus, Zinc and Protein. It is a rare plant food that delivers all eight essential amino acids that our body needs, making it a perfect protein source for vegetarians looking to score complete protein. Moringa is a natural beauty agent as the nutrients in it delivers healthy, glowing skin and stronger hair. Moringa leaves also purify the blood and naturally help in acne reduction.
Research consistently shows that people who eat the most vegetables have the lowest risk of many diseases, including cancer and heart disease. It, however, does not take a scientist to recognise the importance of healthy eating. You can turn to our scriptures, and they too enlighten you enthusiastically about good eating habits.
Enjoy a range of vegetables daily to reap as many health benefits as possible. I conclude by saying, ‘Your diet is a bank account. Good food choices are good investment’.
GROWING WINTER BULBS PART 2
Compiled by Vandna Bhatnagar
In last month’s session, it was discussed which bulbs can be planted in the month of September.
Gladioli is the first set of bulbs which can be grown in the temperature range of 20-35 deg C, which you must have sown by now.
The second set of bulbs which can be grown in the temperature range of 20-25 deg C, in the month of October include Nargis, freesia, Asiatic lily, and oriental lily.
Here are the suggested steps to grow the bulbs, till flowering.
- Soak bulbs in 1 l water and 1 tsp fungicide for 15 minutes.
- Potting mix to grow bulbs – For one kg soil mix
- 500 gm garden soil
- 500 gm compost / vermicompost
- 100 gm cocopeat / river sand
- 50 GM bone meal
- 50 GM neem khali
- 5GM fungicide/ pesticides
- 2GM micronutrients
Mix well
- Plant so that growing point or the neck of the bulb remains out of the soil.
- First watering after planting: Mix 1L water with 2gm fungicide. Spray thoroughly.
- After sprouting 3to 4 leaves: Add more soil.
- After sprouting care: After 15 days, mix 1L water with 2gm fungicide and 2gm NPK (20:20:20). Spray thoroughly.
- Once stick comes out, stop NPK but continue fungicide spray, with 1 gm micronutrients.
Happy planting Bulbs.
(This article is an extract from The Webinar presented by Mr Anurag Srivastav)
ROOTS-OVER-ROCKS BONSAI
Compiled by Sugandha
BONSAI is a Japanese art where a small plant is grown in a pot and is not allowed to grow to its normal size. Roots over the rock is a style in which the roots of the tree are wrapped around a rock entering the soil at the base of the rock.

Main components of this style of bonsai are rocks and plants, along with few accessories. The theme of the bonsai can be Windswept, Mother-and-Child, Dropping etc.
Types of rocks
There are large varieties of rocks to choose from, as described below.
Slate: these are heavy and do not promote root travel, and therefore not recommended.
Aravalli Hill Rocks: They have interesting shapes and contours but are very heavy and, therefore, not recommended.
Khanger: These are light weight and have beautiful contours & crevices. These are highly recommended. Two variants are available of this variety: Grey & black. Grey rock is recommended as it matches the color of cement used for joining the rocks.
Rocks from Uttarakhand river are highly recommended.
Characteristics of the plants that can be used are:
- Plants need to be hardy
- They should have small leaves
- They should be easily to prune.
- Their roots can be exposed as roots will be over the plant.
Few of the plants which can be used include Ficus, Jungle Jalebi, Long Island, Wax Malpighia, Jade(matured), Chinese karonda etc.
Soil Mix
The soil needs to be such that it should be able to hold & retain sufficient quantity of water to supply moisture to the bonsai between each watering and at the same time, it should be able to drain out the excess water. The particles used in Bonsai soil mix should be of sufficient size to allow tiny gaps or air pockets between each particle so as to fulfill the need of oxygen. One can use components like leaf compost, cow dung manure, broken brick pieces, normal garden soil etc. to make a good soil mix.
Steps of Bonsai making
- Use quick setting cement along with Badarpur or marble chips or gravel to join the rocks. Join only 2-3 rocks at a time. Water the rocks the next day so that they join properly (tarai) and join some more rocks to get the desired shape. To enhance the beauty, one can spray Grey and silver paint.
- Cut small pieces of wire, say about 6-8 inches, depending upon the width of stem of the plant and make a shape of number 8 out of it. It will be used as a clip to hold on the plant. Use m-seal to fix this 8-shaped wire clip at various places from where you wish to move your plant. Leave out for a day to dry.
- Next day, you can start placing your plants as per your liking or the theme that has been thought off. Move out small piece of wire through the clip to hold on the plant.
- Use moss, weeds, different types of grasses, miniature artifacts, white or blue gravels (for river) to enhance the beauty of your bonsai.
Aftercare
Finish the composition by placing it over a flat rock platter. Prune the plants so that the demand of nutrients from roots reduces. Water regularly as the soil will dry out quickly. Start fertilizing a month later as the limited soil will lose the nutrients easily.
(Extract from The Webinar presented by Ms Sheel Yadav)
PLANNING FOR DORMANCY, REPOTTING AND PRUNING IN ROSES
Compiled by Vandna Bhatnagar
September and October are ideal months for the rose pruning. Before pruning, putting the plants to dormancy is important to get the plant relaxed after continuous flowering.

Forced dormancy in tropical areas means stopping regular feed to the plant and reducing watering. Plants need to be watered only one time (pl; specify period). Dormancy should last at least one month to one and a half month before pruning.
Care during forced dormancy
- Fertilize with only DAP and calcium nitrate once a month.
- Use pesticides and fungicides regularly.
- No dormancy required for the plant less than 1 year of the age.
Care before Pruning
C1 (One week before)
- Feed DAP 50 gm and Sarson khali 100 gm after soaking in water for three days.
- Dilute with enough water so that it has light tea colour. Feed half Litre of the liquid per plant. This solution is enough for 50 rose plants.
C 2 (Three days before)
Feed all the plants with NPK 0:52:34 (1 gm in 1 litre of water).
C 3 (Two days before)
Spray any insecticide with magnesium sulphate.
Repotting
- If you want to repot then, it should be done before pruning at least 15 days before.
- You can remove 60 % of the soil, without disturbing tap root.
- Add fresh media.
How to prune
Light Pruning: Maximum branches are kept, like in Floribunda and miniature roses to get maximum blooms.
Remove only unhealthy and dead branches.
Hard Pruning: Use only sterilised cutting tool and remove all the weeds and dry leaves before pruning.
- Remove all the leaves before pruning.
- Branches of pencil thickness should be kept.
- Remove branches which are crossing each other even if they are thick.
- Cut the branch at least 1 inch above the node.
- Remove all the weak, dead and dry branches.
- If basal branch is present, do not cut it completely.
Care after pruning
- Same process C1 ,C2 ,C3 ,you need to repeat after pruning for one week.
- Do not feed for next 12 days after Step 1.
- After 12 days start rose feed.
Hope this season we all will have very pretty blooms of roses. Do not forget to share pictures.
Happy planting roses.
(Extracts from The Webinar presented by Mr Rahul Kumar)
RANGOLI
Rashmi Aggarwal
Rangoli is a traditional art of India. In every state of India, Rangoli is made on the floor by people on festivals and other occasions. The purpose of Rangoli is to feel strength, a symbol of generosity, and it is thought to bring good luck.
Rangoli in different parts of India is known by many names, like Alpna, Chouk Poorna etc.
Rangoli can be made dry & wet. Materials used to make Rangoli are rice powder, coloured sand, flower petals, natural colour, gulal, Geru etc.
Rangoli on water with dry colour
- Take a transparent flat dish. Fill it with water.
- Then make a thick layer of dry colour/ Talcum powder.
- Make a design on this layer with dry colour.
- You can use floating candles for decoration.

Rangoli on water with flower petals
- Take a transparent flat dish.
- Fill it with water.
- Use different colours of flower petals & leaves to make design.
- We can use accessories for decoration.

Rangoli in the water
- Take a flat dish.
- Grease the dish with any oil (coconut, mustard oil).
- Make a design with dry colour.
- Fill water very slowly from the side of the dish.
- Use accessories for decoration (Diya, floating candle etc).
“जल बचाओ,कल बचाओ”
सर्वज्ञ शेखर
यह विडंबना ही है कि लगभग 75 प्रतिशत भूभाग जलच्छादित होते हुए भी हमारा देश भयंकर जल संकट से गुजर रहा है । स्थिति इतनी भयावह हो गई है कि गांवों में कूए,ताल,तलैया,नदियां सब सूख गए हैं, और अनेक क्षेत्रों में तो नालों के गंदे पानी से गुजर बसर करनी पड़ रही है । नदियों को सूखने से हम लोग बचा नही पा रहे , उन्हें गन्दा कर रहे हैं, अत्यंत खेद का विषय है कि नदियों में मलवा व कारखानों-फैक्ट्रियों का केमिकल युक्त रिसाव किया जा रहा है, कहीं कहीं तो सीवर लाइन तक नदियों से जुड़ी हैं । यह स्थिति अत्यंत ही शर्मनाक है, खेदजनक है । नदियों की सफाई के नाम पर करोड़ों अरबों रुपयों की धनराशि व्यर्थ जा रही है ।

जल, दो अक्षरों का यह शब्द केवल एक शब्द ही नही वरन समस्त संसार की जीवन धारा है ।केवल यह संशय सदैव रहता है कि पानी को ईश्वर के समकक्ष रखा जाए या उनसे भी ऊपर । परन्तु माना यही जाता है कि जल ईश्वर के प्राकट्य से पूर्व भी उपलब्ध था । इसके अतिरिक्त प्रकृति व प्राणी मात्र को जीवन प्रदान करने का ईश्वर के पास पानी ही सशक्त माध्यम है । अतः दोनों को एक दूसरे का पूरक भी कहा जा सकता है ।
भारतीय ऋषि-मुनियों ने पानी को उसके मौलिक रूप में नारायण माना है। वह नर से उत्पन्न हुआ है इसलिये उसे नार कहा जाता है। सृष्टि के पूर्व वह अर्थात नार (जल) ही भगवान का अयन (निवास) था। नारायण का अर्थ है भगवान का निवास स्थान। पानी में आवास होने के कारण भगवान को नारायण कहते हैं। पानी अविनाशी, अनादि और अनन्त है।
आपो नारा इति प्रोक्ता, नारो वै नर सूनवः।
अयनं तस्य ताः पूर्व, ततो नारायणः स्मृतः ।।
ऋग्वेद संहिता में तो जल को अमृत कहा गया है ….
अप्सु अन्तः अमृतम् अप्सु भेषजम् अपाम् उत प्रशस्तये, देवाः भवत वाजिनः ।
शब्दार्थः जल में अमृत है, जल में औषधि है । हे ऋत्विज्जनो, ऐसे श्रेष्ठ जल की प्रशंसा अर्थात् स्तुति करने में शीघ्रता बरतें ।
रामचरित मानस में भी गोस्वामी तुलसीदास जी ने भगवान राम के मुखारविंद से ज्ञानवर्धन कराते हुए कहा है…
क्षिति जल पावक गगन समीरा।
पंच रचित अति अधम शरीरा।।
लेकिन इतने अमूल्य जल का न तो हम भली प्रकार से संचय करते हैं और न ही संरक्षण के उपायों पर अमल करते हैं ।जल संकट की जिस विषम परिस्थिति से हम गुजर रहे हैं उसके उत्तरदायी कोई और नहीं वरन हम और आप ही हैं ।
सोचिए,कुछ अवश्य सोचिये और अभी से ही निश्चय कीजिये कि नदियों को सूखने से बचायें, उन्हें प्रदूषित न करें, वर्षा का जल संचित करें, जल की एक बूंद भी बर्बाद न करें । “जल बचाओ,कल बचाओ।”
SOIL DISEASES AND REMEDIES
Sandeep Rohilla
Soil contains both beneficial organisms and pathogenic organisms such as fungi, nematodes, bacteria and viruses. Pathogenic fungi and nematodes (tiny worms) are responsible for the majority of soilborne diseases. Plants grow well when populations of beneficial and harmful organisms are well balanced. However, when environmental conditions change and populations become unbalanced, plants become diseased. The success of treatment for soilborne plant disease depends upon on the environment conditions, the nature of the pathogenic organism and sensitivity of the plant.

Remedies
Cultural Methods
Adding compost to the soil increases the number of beneficial organisms, which will out-number the pathogenic organism for nutrients and inhibit the gemination of fungal spores. Mixing compost with soil also improves the structure and drainage of the soil. Overly moist soil is conducive to the growth of many pathogens, or harmful organisms. Preventing nutrient deficiencies and adjusting the soil pH are other methods to treat soil disease. For example, wilting and root rot of seedlings caused by damping-off disease due to Pythium species may be prevented by adding some calcium. Adjust the soil pH to grow healthier and stronger plants and to prevent the survival of pH-sensitive pathogens such as clubroot (Plasmodiophora Brassicae), which causes swelling and root rot of vegetable roots. Applying lime to raise the pH to 7.3 or higher prevents clubroot.
Crop Rotation
When vegetables or annual flowers are repeatedly grown in the same location, there may be build-up of harmful organisms that favour these plants. One method to avoid soil pathogen build-up is to rotate vegetables or other plants each year. Once a pathogenic organism has established itself in a given soil location, you may have chances that you may avoid problems for next two to three years, depending on the type of specific disease organism. Also, don’t plant the garden bed with closely related plants, because the pathogen may attack them. Many home gardeners don’t have the luxury of using multiple garden pots for crop rotation and need to resort to other methods.
Solarization
Solarization uses the sun’s energy to heat the soil and kill harmful organisms. The heat treatment also kills most beneficial soil organism and weed seeds, as an extra bonus. The addition of compost replenishes beneficial organisms. Solarization takes several weeks to months to work. Long summer days are best, while cool rainy days will not do the same job. Place a clear, 0.5 to 4 mm thick plastic sheet or trap over moist soil. You must bury the edges of plastic sheet in the soil. The main drawback to this method in that the garden plot cannot be used for whole season.
Fungicides
Chemical and biological fungicides kill either a specific type of pathogen or a large range of soil pathogens. The chemical fungicide Mefenoxam, for example, kills the pathogenic fungi Pythium and Phytophthora, but is not effective against other soil pathogens. PCNB, also called Quintozene, is effective against a number of fungi, including sclerotium Rolfsii, which causes southern wilt.
Biological fungicides are soil-borne fungi that control harmful fungi. Glaucidium virus controls the disease-causing fungi Pythium and Rhizoctonia, while the Trichoderma Harzianum Fungus kill Rhizoctonia.
START COMPOSTING Part 2
Vandna Bhatnagar
It is the need of hour to compost your kitchen waste. In previous issue, we had discussed various types of the composting. I am sure that you must have made up your mind and chosen a method you want to adapt for composting.
Once we have decided upon method of composting, it is time to discuss various components required for composting.
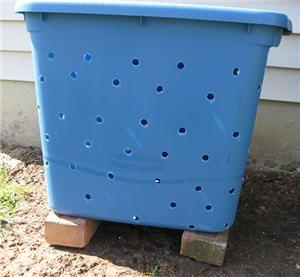
Aerobic composting
- Plastic bucket/ paint bucket/ drum: If holes are not present then you need to drill holes at the top and some at the bottom. The holes should not be very big. Choose a medium size as when you need to turn the organic waste ,it should be easy to turn.
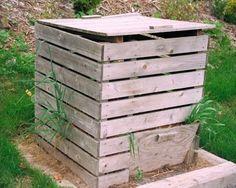
- Wooden pallet box: Join the pallets to form square and leaving some space between ground and the square you have made.
- Wire mesh bin: You can use wooden poles or sticks with chicken wire wrapped around them to form a circular or square composting bin. This is simple and economical bin. The things required are only chicken wire, wire mesh or wire fencing and it takes few minutes of time to join.

- Earthen ware: Earthen pots have numerous microscopic holes on it for enough aeration inside the pot. You will need two earthen pots with lids.
- Commercial Bins: In market, commercial read made compost bin are also available.

Dry Anaerobic Composting
It can be in done in ground with a pit about 1 m deep, 1.5-2 m wide, and of a suitable length according to the area you can afford.
A dug-out pit in the ground is to be filled tightly with organic matter which we want to compost and then it is sealed from the surrounding air by a layer of soil.
Wet Anaerobic composting–
Use a paint bucket with lid and a tap to remove compost tea.
You can even use a polythene bag which can be tightened.
So now you know which container you can use for home composting. Decide and find out best compost bin depending upon your available space. Keep reading about composting and in
In the next issue, we will know about what can be added in the compost bin.
Be ready for your participation in Clean India initiative. You can send message to me in case you have a query.
Journey Of A Bottle Gourd
Amrita Bharti
I wanted to grow bottle gourd. The first two attempts were unsuccessful. But that could not discourage me. My failure lead me to get connected with an expert and many articles.
Stage-1
I got a new pack of seeds again to try with new ways to germinate it. This started with new hope and positivity.

Stage-2
The journey started with banana leaf. Seeds were wrapped with it and was kept in a dark place. After 5 days, I could not believe to my eyes that this time all the seeds were germinated. Nature is amazing. A new life was about to come in my beautiful garden.

Stage-3
I sowed my little babies in the mixture of soil, cocopeat and compost. Soon roots started developing and to my surprise one day I saw a tiny little baby coming out of the soil.

Stage-4
My tiny babies started growing really fast and soon it was ready to see the world as its outer cover was broken and its leaves started developing.

Stage-5
After 3-4 days when I went to my garden early in the morning, I felt like someone was spreading his arms toward me and want me to carry him. Yes! You guessed it right. It was my bottle gourd baby. Cute innocent and very soft. I have to protect him from harsh sun rays and from overwatering.
Because of the right nutrition it was growing really fast.

Stage-6
And finally the big day had come for him to get a permanent pot with lots of soil and place to grow.

After the transplantation it was looking very happy and I had a feeling of deep satisfaction. Few coconut ropes were hanged for him to climb up high.
Now its growing really well and I am sure very soon it will be on the top of my terrace and waving his leaves to me. I need to twist my neck to see him and get a step stool/ ladder to reach him.
In return of my love and care he has promised me to give me lots of fruit vegetables soon. And I trust him.
And this is not the end: As I had many seeds with me, I distributed many to my friends so that they can grow bottle gourd as well.
My story so far: I had a garden for last 10 years but got into gardening seriously during lockdown. After few months of hard work and knowledge gaining, I started a gardening whatsapp group for my society. The idea was to spread gardening and related information. Later I joined many gardening related groups and came across many experts and webinars.
I motivated my society people to convert their balcony into a balcony garden. I helped them with all the gardening needs, like fertilizers, plants, seeds, pot stands; and also information/gardening tips.
Everyone in my society is very thankful to me for such an initiative. But honestly I am thankful to them for trusting me. Because of them I got a different direction to work for mother nature. Their trust and appreciation motivates me to work harder and harder.
In this pandemic situation where everyone is getting frustrated, I am happy that I could find a new way to be engaged that can make people happy. I am truly enjoying with my plants and many new friends whom I came to know through gardening.
I am also thankful to this group where I am learning everyday and got to know many like minded people.
*Photograph credits HFSOG members & various sources and websites.
Good blog you have got here.. It’s difficult to find excellent writing like yours nowadays. I honestly appreciate people like you! Take care!!