

Economics Vs Mangonomics
I will take you back to 1970s. That is what I still call a golden period of my life.
Imagine this: a calm village in UP, outskirts of Distt Hardoi, a big village house, with thatched roof, and mud walls, which used to be smeared with fresh cow-dung, including the floors. As the dusk fell, a small lantern used to light up the area.
There used to be a huge Neem tree, under which was a cot, where my Nana ji used to sit and relax. He was a retired Post master of that village. (In those times, village post master was supposed to be the most learned man in the area.)

My Mama ji was a tailor master, who used to be very busy during the marriage season. But we 5 cousin brothers and one sister always used to wait for Mamaji to come from the market and bring a bag full of mangoes, which used to be dipped in cold water drawn by the hand pump, to be enjoyed after the meals.
But slowly, those mangoes are going to be only in the sweet memories, like our annual visits to the village.
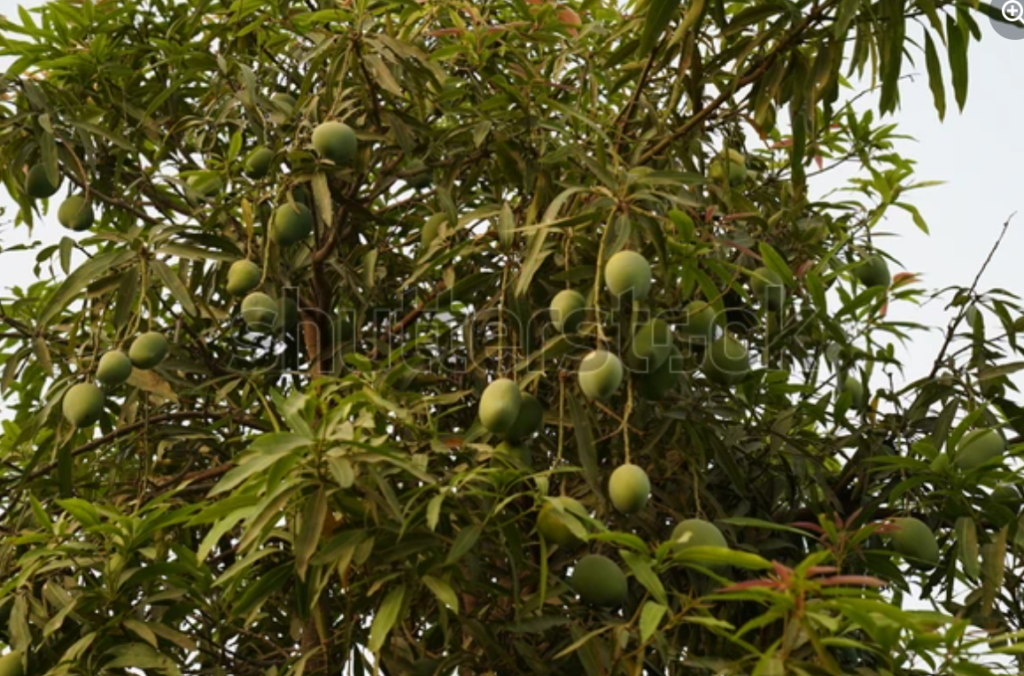
One of the varieties that we used to enjoy, and still do at times, is called “Langda” variety of mango. A small town in West Bengal by the name of Malda is famous for this variety of the fruit. Till about couple of years back, a drive along Malda-Manickchak highway would have taken you through a dense forest of mango-laden trees, drooping with the weight of the fruits.
These days, many orchards are bearing the tell-tale markings saying ‘Plot for sale’ . The price of land at the outskirts has taken over the profits of this mango variety. The ban on export of the mango, and bumper production over the years has spelled doom for the farmers.
The produce from one orchard measuring ’20 cottahs’ (each cottah in Bengal means about 600 Sq ft), would fetch a farmer INR 1.5 Lacs. But the same piece of land now can fetch a whopping INR 1.5 Cr, which is equivalent t income for next100 years. This is the main reason of vanishing mango orchards.
The land records show that mango cultivation area has dropped from 34 thousand hectares to 31 thousand hectares in last 3 years.

Keeping and maintaining Mango orchards today has come to be known as luxury, keeping in mind the cost of spraying, night vigil, plucking, and transportation to the market.
The concerned departments somehow express inability to arrest the trends, as orchard tres are not counted as forest trees and can be cut.
However, though the Govt is considering the laws banning cutting of the orchards, like tea gardens, unless done, the famous Langda mango may be a thing of the past.

GARDENING IN MONSOON
(A Very Busy Month)
Monsoon is at its prakar (peak), and humidity is high. It is the ideal time for the propagation of various plants. We wait the whole year for this season — a golden opportunity to increase our green collection.
🌿 Lawn
If you haven’t treated your lawn yet, you can still do it. Fertilise it, and if application of lime is required, go ahead and give it.
Cuttings of various plants like money plant, Acalypha, hibiscus, passion flower, gardenia, bougainvillea, plumbago—almost every cutting—can be rooted in sand, perlite, vermiculite, or coco peat.
🌳 Maintenance
Overgrown hedges, creepers, and trees can be trimmed or pruned to allow weaker varieties to grow.
Climbers and creepers should be overhauled by thinning out unwanted growth and tying the healthy parts in position.
Add manure, and keep breaking the surface throughout the season for better aeration.
💧 Watering
While the monsoon lasts, irrigation of lawns, shrubs, roses, and potted plants should be minimal. Let nature do the watering!
🌱 Sowing & Transplanting
● Rose plants can be transplanted now.
● Start sowing for early crops like cauliflower, cabbage, lettuce, celery, and also spinach, brinjals, and tomatoes.
● Hardy annuals can also be sown now.
● Gladiolus corms can be planted during this month.
● Prepare pots and beds for winter annuals.
● Chrysanthemums may be shifted to their final pots towards the end of the month.
🌼 Happy Gardening!
Make the most of this magical time and let your garden flourish!
DK SHARMA
‘मंज़िल की जिसको धुन, उसे कारवाँ से क्या ‘
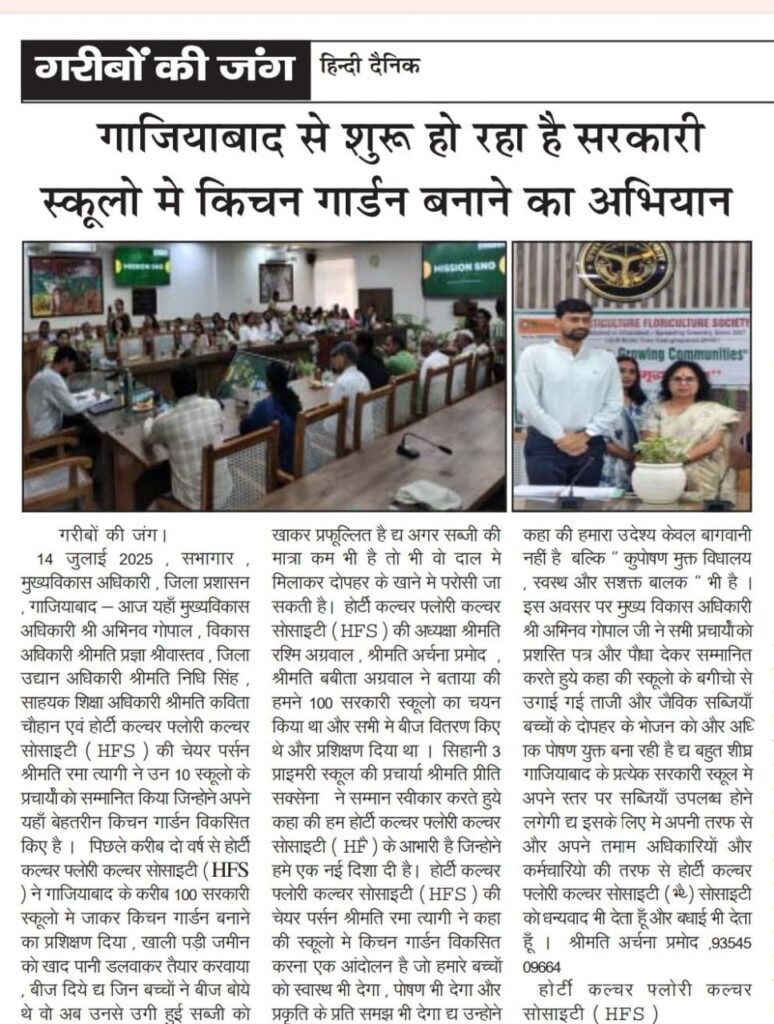
“विद्यालय पोषण वाटिका”
प्रोत्साहन एवं पुरस्कार वितरण समारोह
जिला मुख्यालय के दुर्गावती देवी सभागार, विकास भवन में 14/07/2025 को बेसिक शिक्षा अधिकारी एवं नगर निगम के स्कूलों के प्राचार्यों को प्रोत्साहन एवं पुरस्कार वितरण समारोह, स्वेच्छिक संस्था होर्टीकल्चर फ्लोरीकल्चर सोसाईटी के द्वारा सभा में उपस्थित:
1) मुख्य विकास अधिकारी श्री अभिनव गोपाल 2) जिला विकास अधिकारी श्रीमती प्रज्ञा श्रीवास्तव 3) बेसिक शिक्षा अधिकारी श्री ओ० पी० यादव 4) उपबेसिक शिक्षा अधिकारी ममता भारती एवं कविता चौहान 5) 5 ब्लाक शिक्षा अधिकारी 6) जिला उद्यान अधिकारी मृदुला कुमारी 7) मीडडे मील अधिकारी टींकू कंसल 8) डी०सी०एम०आई०सी० से रूचि त्यागी और 9) बेसिक शिक्षा विभाग से पूनम शर्मा तथा 60 स्कूलों में से सम्बन्धित प्राचार्य उपस्थित थे।
अवसर था संस्था द्वारा विगत दो वर्षों से प्रशासन, स्कूल (प्राचार्य एवं विद्यार्थीयों) के सहयोग से विद्यालय में उपलब्ध जमीन पर “विद्यालय पोषण वाटिका” के निर्माण से जैविक सब्जियों का उगाया जाना और सब्जियों का उपयोग मीड डे मील में होना। यह एक स्वेच्छिक आधार पर प्रयोग और प्रयास अतीत सफलता को प्राप्त हुआ। इस विशेष अवसर पर जिला सभागार में आयोजित होना एक उपलब्धि है। उत्सकता पूर्ण और उत्साहपूर्ण में कार्यक्रम शुरू हुआ।

इस अवसर पर 10 प्राचार्यों को “विद्यालय पोषण वाटिका” (स्कूल न्यूट्रिशियन गार्डन्स) के उत्कृष्ट प्रदर्शन के लिए..
1) प्रसस्ति पत्र
2) प्रसस्ति चिन्ह
3) गिफट हैम्पर्स (पेस्टीसाइडस, नीम आयल, ग्रोथ प्रोमोटर, हयूमिक एसीड, स्प्रे बोटल्स एवं बायो इंजायम्स) दिये गये।

इसके अतिरिक्त आए 50 अन्य प्रचार्यों को
1) प्रसस्ति पत्र
2) क्वायर पोट
3) कोकोपिट
4) कम्पोस्ट तथा
5) मोरिंगा सहजना के पौधे देकर उनके सफल पूर्वक प्रयासों का सम्मान किया गया।
सभा का आरम्भ करते हुए मुख्य अधिकारी ने स्वेच्छिक आधार पर किए जा रहे गहन प्रयासों की प्रशंसा की और समय समय पर इसका संज्ञान भी लेते रहे। इन्होने इसे पाठ्यक्रम का भाग न होते हुए विद्यार्थियों के सर्वागीण विकास की चर्चा की। जैविक खेती, सब्जियां तथा प्रर्यावरण भविष्य की जरूरतें हैं और विद्यार्थियों के यह कौशल स्वाभिक रूप से आना चाहिए।
इसके पश्चात प्राचार्यों द्वारा विभिन्न प्रकार के प्रश्न किए गए जिनका संतोषजनक प्रतिउत्तर दिया गया। पूरे का पूरा माहोल उत्साहजनक रहा और प्राचार्यों ने और अधिक बढ़ चढ़ कर भाग लेने का आश्वासन दिया।
संस्था द्वारा मुख्य रूप से सिहानी साहिबाबाद, लोनी, इन्द्रापुरम, दुहाई, हरसॉव, बम्हैटा, ब्याना काजी पूरा, नंदग्राम गाजियाबाद, मोरटा मोरटी तथा अन्य विद्यालय।
संस्था द्वारा अपने स्तर पर व्यक्तिगत वाहनों के द्वारा विद्यालयों में जाना, उपलब्ध भूमि पर पोषण वाटिका का निर्माण, एवं रखरखाव और बीच बीच में इन सब का निरिक्षण करना और उपयुक्त सलाह और सम्मान देना। इस स्वेच्छिक आधार पर की गई सफलता प्रशासन, विद्यालों, विद्यार्थियों के लिए एक उदाहरण बन गयी है।
इस अवसर पर प्रशासन, जिला बेसिक शिक्षा मीड डे मील एवं डिजिटल विभाग के अधिकारियों में भविष्य में भरपूर सहयोग का आश्वासन दिया।
इस अवसर पर स्कूल न्यूट्रिशन गार्डन्स पर श्री ईशान त्यागी द्वारा स्क्रीनस पर उत्साहवर्धक प्रजेन्टेशन दी गयी। संस्था का उद्देश्य पूर्णरूप से विद्यार्थियों जौविक वाटिका को घर पर लगाना और इस प्रकार का कौशल उनके भविष्य में सहायक हो।
सभा श्रीमती अर्चना प्रमोद एवं पूनम शर्मा जी द्वारा संचालित की गयी। इसके अतिरिक्त संस्था से 1) श्रीमती रश्मी अग्रवाल, अध्यक्ष 2) श्री डी० के० शर्मा उपाध्यक्ष 3) श्री कपिल गर्ग सचिव 4) श्रीमती सैल्जा मिश्रा (कैशियर) 5) श्री के० एन० गर्ग 6) श्रीमती सोनिया अग्रवाल 7) श्रीमती सुधा अग्रवाल 8) श्री पी० के० मल्होत्रा
सभा सोहार्दपूर्ण वातावरण में सम्पन्न हुई। शुभकामनाओं सहित,
रमा त्यागी (चेयर पर्सन)
From the lens of the members..


🌱 5 Best Growing Mediums for Microgreens
(With Procedure, Local Seeds, and Millets)
Microgreens are young, edible seedlings harvested at the first true leaf stage—typically within 7–15 days. These miniature greens are rich in nutrients, vibrant in flavor, and surprisingly easy to grow at home. However, the success of your microgreen garden heavily depends on the growing medium you choose. Here’s a guide to the top 5 mediums, local seeds (including millets) you can use, and a step-by-step procedure to grow your own microgreens effortlessly.

🧪 Step-by-Step Procedure to Grow Microgreens
Materials Required:
- Microgreen seeds (local seeds or millets)
- Tray or shallow container with drainage holes
- Chosen growing medium (coconut coir, hemp mat, jute mat, vermiculite/perlite, hydroponic setup)
- Water spray bottle
- Natural light or grow light
- Optional: Cover/lid or paper for dark germination stage
Procedure:
- Prepare the Tray:
Clean the tray and ensure it has drainage holes. Place it over a drip tray if needed to catch excess water. - Add the Growing Medium:
Coconut coir: Soak in water until it fluffs up, then spread evenly in the tray (1–2 cm thick). Mats (hemp/jute): Cut to fit the tray and moisten with a spray bottle. Vermiculite/perlite: Mix and spread evenly across the tray. Hydroponics: Set up the system as per kit instructions and place mats or mineral medium accordingly.
- Sow the Seeds:
Evenly scatter your seeds over the surface. Avoid overcrowding. Lightly press them down with a spoon or hand for seed-to-medium contact. - Moisture and Covering:
Mist with water gently. Cover with a lid, another tray, or newspaper for 2–3 days (dark period) to promote germination. - Uncover and Light:
Once seeds begin sprouting (usually on Day 2–3), remove the cover and place the tray where it gets indirect sunlight or under a grow light. - Watering:
Spray with water 1–2 times daily. Ensure the medium stays moist but not soggy. - Harvesting:
Harvest in 7–14 days when the first true leaves appear. Use clean scissors to snip the microgreens just above the medium. - Clean Up:
Compost used mats or coir. Clean trays before reusing.
🌿 Best Growing Mediums for Microgreens
1. 🥥 Coconut Coir
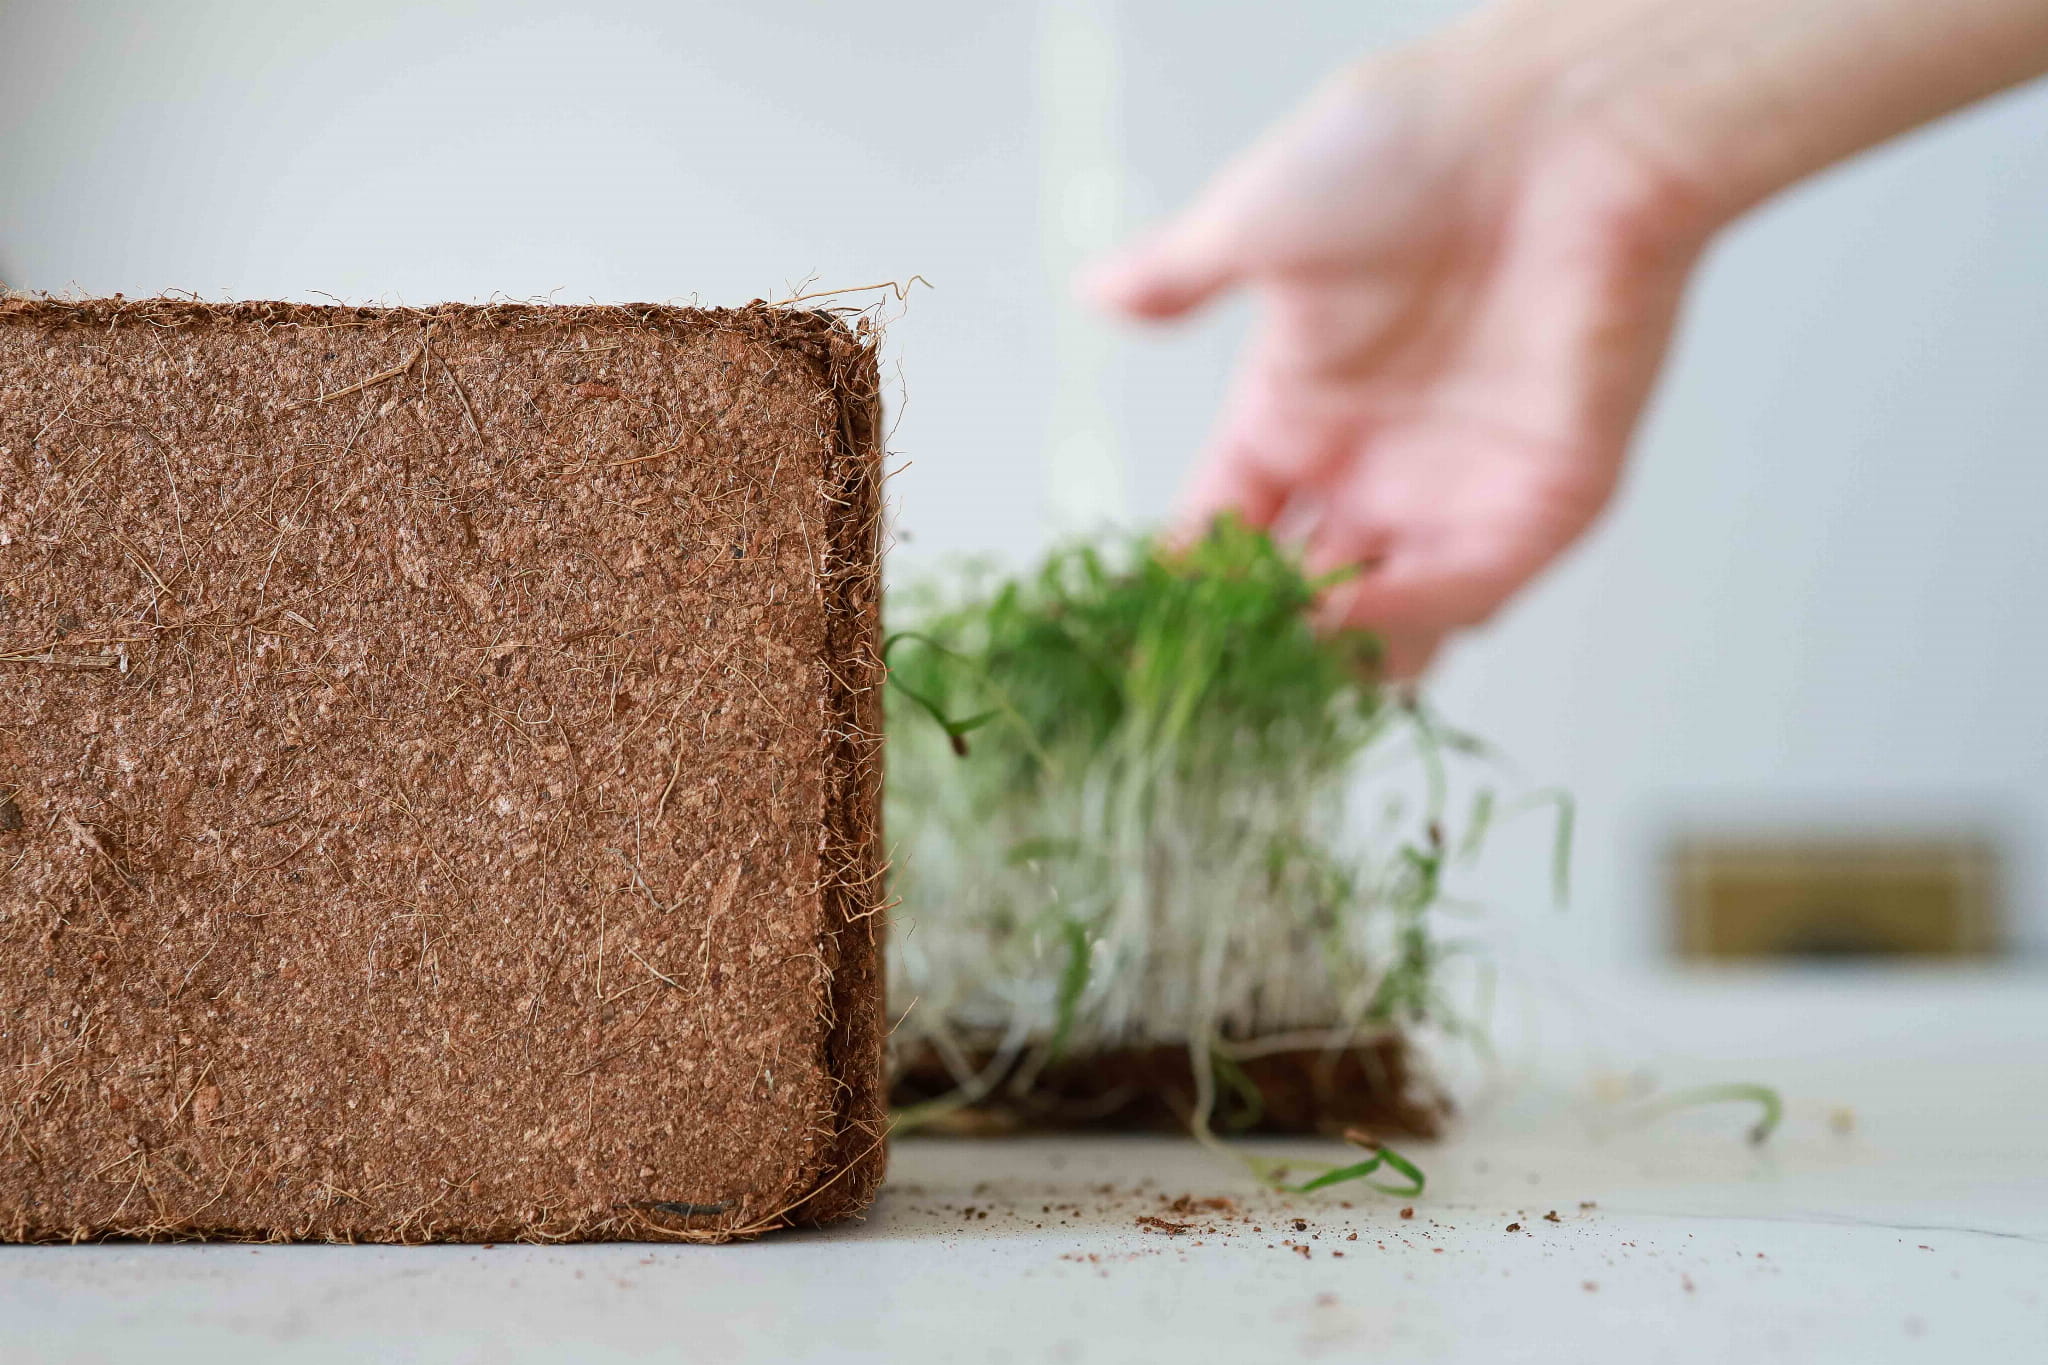
- Pros: Sustainable, excellent water retention, root aeration.
- Use For: Broccoli, radish, methi, coriander, spinach, basil, moong.
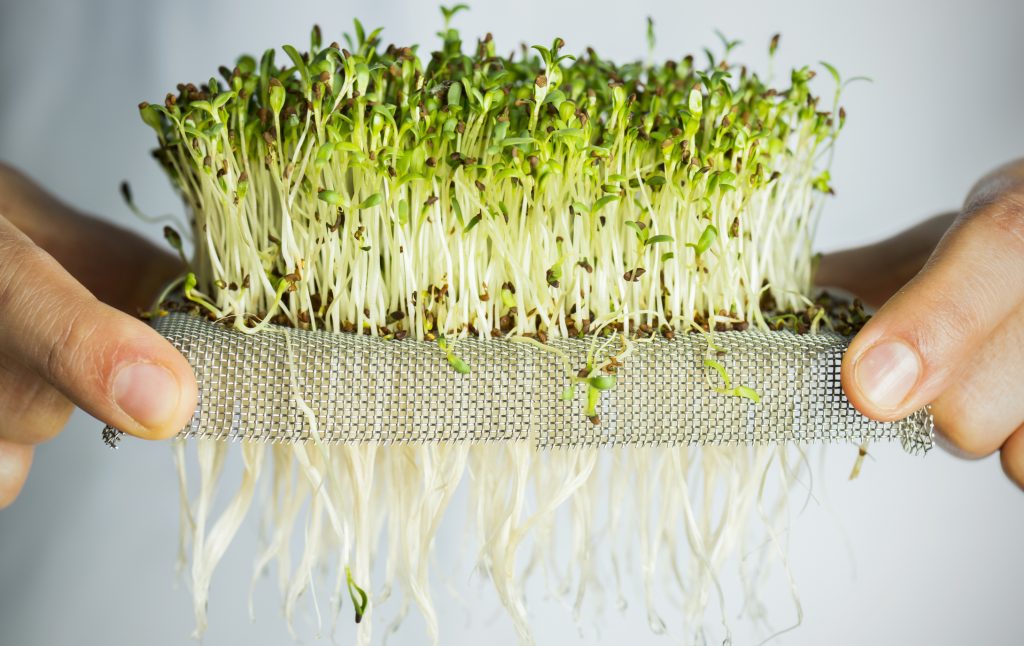
2. 🌾 Hemp Mats

Pros: Mess-free, biodegradable, ready-to-use.
Use For: Wheatgrass, alfalfa, amaranth, beet greens, kale, mustard, basil.
3. 🌿 Jute Mats

Pros: Strong, porous, compostable.
Use For: Sunflower, pea shoots, arugula, radish, mint, turnip greens, chia.
4. 🪨 Vermiculite and Perlite Mix

Pros: Mineral-based, reusable, mold-resistant.
Use For: Lettuce, carrot tops, onion greens, mustard, dill, fenugreek.
5. 💧 Hydroponic System
Pros: No soil needed, fast growth, efficient nutrient delivery.
Use For: Basil, spinach, Swiss chard, herbs, micro lettuce, cabbage.
🧄 Local Seeds That Sprout Easily as Microgreens
Many kitchen staples are excellent for sprouting into nutritious microgreens:
- Methi (Fenugreek)
- Rai (Mustard)
- Dhaniya (Coriander)
- Kala Chana (Black Gram)
- Moong Dal (Green Gram)
- Urad Dal
- Moth Bean
- Wheat
- Barley
- Alfalfa
- Amaranth (Rajgira)
🌾
Millets as Microgreens: A Nutritional Powerhouse
Millets are hardy, climate-smart crops—and their microgreens are equally powerful in nutrients. They’re protein-rich, gluten-free, and easy to grow.
✅ Millet Seeds Suitable for Microgreens
- Bajra (Pearl Millet): Nutty flavor, promotes gut health.
- Jowar (Sorghum): Antioxidant-rich, ideal for salads.
- Ragi (Finger Millet): High in calcium and iron.
- Foxtail Millet (Kangni): Crisp, light texture.
- Kutki (Little Millet): Mild taste, easy to digest.
- Sanwa (Barnyard Millet): Quick germination, soft leaves.
These millet seeds grow well in coconut coir, mats, or hydroponic trays and can be harvested within 10–12 days.
✅ Tips for Success
- Use filtered or boiled-cooled water for spraying to avoid fungal issues.
- Ensure adequate air circulation to prevent damping-off (fungal disease).
- Avoid direct harsh sunlight—bright indirect light works best.
- For school or community projects, choose fast-growing, safe seeds like moong, wheat, and mustard.
🌱 Final Thought
Microgreens are proof that you don’t need a big garden to grow your own food. With a simple tray, a bit of care, and the right growing medium, you can harvest fresh greens packed with vitamins and flavor right from your windowsill. Incorporate local seeds and millets to make your microgreen garden not just healthy—but rooted in traditional wisdom and sustainability.
Grow Beets Organically: A Powerhouse of Health and Vitality
Beets are not only easy to grow organically but are also packed with nutrients and powerful health benefits. From improving stamina to supporting brain function, this vibrant root vegetable deserves a place in every kitchen garden.
🌿 Health Benefits of Beets
💪 1. Detox Powerhouse
Beets are rich in antioxidants and betalains, which support liver detoxification and help reduce inflammation.
⚡ 2. Boosts Stamina
The natural nitrates in beets improve blood flow and oxygen use, increasing energy and endurance.
❤️ 3. Heart-Healthy
Regular beet consumption helps lower blood pressure and reduce cholesterol levels.
🧠 4. Brain Support
Improves circulation to the brain, aiding memory and overall cognitive function.
🥗 5. Nutrient-Dense
Packed with folate, iron, vitamin C, manganese, and dietary fiber.
🍬 6. Natural Sweetener
A low-calorie way to add a touch of natural sweetness to your juices, salads, and smoothies.
👨🌾 How to Grow Beets Organically
📍 Soil Preparation
- Loosen soil to at least 20 cm deep to allow proper root development.
- Maintain a pH range of 6.0–7.5 (slightly acidic to neutral).
- Mix in aged compost or worm castings; avoid fresh manure as it may promote leafy growth over root formation.
🌱 Sowing Instructions
- Direct sow seeds 1 cm deep and 5–10 cm apart in rows.
- Once they sprout, thin seedlings to about 10–15 cm apart to give each plant enough space.
- Best planting seasons: Early spring or autumn (cool temperatures suit beets best).
💧 Watering
- Keep the soil consistently moist, but never soggy.
- Water early in the day to prevent fungal infections.
🌞 Sunlight
- Beets need full sun (minimum 6 hours/day), but can tolerate light shade.
🐞 Organic Pest Control
- Grow beets near onions, garlic, or mint as companion plants to deter pests.
- Use neem oil or insecticidal soap for aphids and leaf miners.
- Mulch with straw to retain soil moisture and suppress weeds.
🥬 Harvest Tips
- Harvest when roots are 5–7 cm wide – smaller beets are more tender.
- The leaves are edible too! Use young greens in salads or cook mature leaves like spinach.
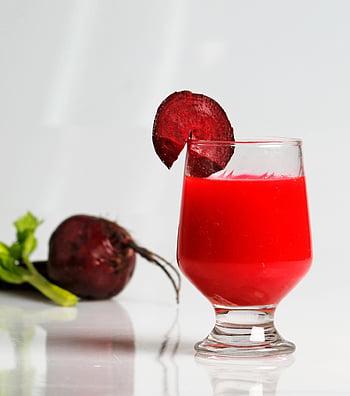
🥤 Bonus Tip
Try a fresh beet juice with apple and ginger – a natural vitality shot packed with energy and nutrients!
Beets are a vibrant, health-boosting, and easy-to-grow addition to your garden. Whether you’re growing them for their sweet roots or nutritious leaves, this versatile vegetable will reward you with both flavor and health benefits.


Happy Gardening
Rama Tyagi
tyagirama1@gmail.com
From Soil to Streets: Millipedes and the Monsoon Connection
With the onset of the rainy season, many of us notice an unusual increase in the number of millipedes crawling around our homes, gardens, and streets. But what brings these soil dwellers above ground during monsoon? Let’s explore the fascinating connection between millipedes and the rainy season.
🌿 Why Millipedes Emerge During the Rainy Season
- Soil Saturation
Millipedes are detritivores—organisms that feed on decaying organic matter—and thrive in moist environments like soil and leaf litter. However, when it rains heavily, the soil becomes waterlogged or even flooded. This condition hinders their ability to breathe, as they respire through spiracles which can get blocked in water. In search of drier ground, they surface and migrate, often ending up in open areas or homes. - Increased Humidity
Although millipedes prefer moisture, excessive dryness can be fatal. The high humidity of the monsoon season offers an ideal environment for them to remain active without the risk of drying out. As a result, they venture out more frequently during this time. - Breeding Season
Monsoon is also the prime breeding period for millipedes. The damp and organic-rich environment supports reproduction and egg-laying. During this phase, they move around in search of mates and suitable nesting sites, leading to increased visibility above ground. - Habitat Disturbance
Human activities such as agriculture, construction, and the movement of rainwater often disturb their natural underground shelters. This forces millipedes to relocate and become more visible in our surroundings.

🐛 Know the Millipede: A Quick Biological Profile
● Scientific Class: Diplopoda
● Body: Long, cylindrical or slightly flattened, composed of many segments
● Legs: Two pairs per segment (unlike centipedes which have one)
● Color: Typically brown to black; some species appear reddish or striped
● Diet: Decomposers—feed on dead plant matter, organic debris, and fungi
● Behavior: Slow-moving and non-aggressive; they often curl into a coil when threatened
● Defense Mechanism: Some species release irritating or noxious chemicals when disturbed
❗Are They Harmful?
Contrary to popular belief, millipedes are not harmful to humans. They do not bite or sting. However, in large numbers, they may become a nuisance, especially around homes or gardens. On rare occasions, they can damage tender seedlings in nurseries or greenhouses by feeding on soft plant tissue.
🌱 Millipedes in the Ecosystem
Millipedes play a crucial role in nutrient cycling. As nature’s decomposers, they break down organic material, thereby contributing to soil formation and enhancing soil fertility. Their presence is an indicator of a healthy, organic-rich environment.
🌧️ In Conclusion
While their sudden appearance during monsoon may be alarming, millipedes are silent contributors to the ecosystem. Instead of fearing them, understanding their behavior and ecological importance helps us appreciate their role in maintaining the balance of nature—especially in the lush, thriving world beneath our feet.
Did you know?
Millipedes can live up to 7 years and some species are known to glow in the dark as a warning to predators!
Let this monsoon be a reminder that every tiny creature, even the humble millipede, has a purpose in the grand cycle of life.
Happy Gardening
Rama Tyagi
tyagirama1@gmail.com
FERTILISER BURN
Fertilising plants result in strong roots and stems, vibrant foliage, bright blooms, and tasty fruit. But sometimes with fertilisers, less is more, especially for houseplants. Indoor gardens live in pots and rely on supplemental feeding for nutrients. How much is right for a specific plant can be tricky and over fertilising is a mistake that can burn tender roots and foliage.

What Is Fertilizer Burn?
Fertiliser burn occurs when a plant is fed too much or too often. Fertilisers contain salts that build up and remain in soil after roots soak up nutrients, eventually causing damage. Most houseplant fertilisers are water soluble and either rapid or slow release. The effects of overfertilizing with rapid release formulas will appear fairly quickly, while symptoms caused by slow-release formulas can take up to two weeks to appear.
Signs of Fertilizer Burn on Houseplants
Here are some signs which show plants could have fertiliser burn..
- White Crust: White crust that appears on the soil surface, inside or outside of the pot, or foliage and stems is salt accumulation. It’s an early sign fertiliser is too strong or you’re applying it too often.
- Brown Leaf Tips and Margins: Brown leaf tips and edges indicate incorrect watering and/or fertilising. When you see this after a fertiliser application, chances are roots are taking up excess salt causing foliage to become dry and brittle.
- Stunting: Growth slows or stops completely. New leaves fail to develop or turn yellow, brown and drop. Plants form flower buds that drop before opening. Salt buildup is diverting moisture away from the roots, slowing photosynthesis and inhibiting new growth.
- Wilting: Leaves become limp and droopy eventually turning black and falling off. Stems lose rigidity. The plant may fall over or collapse. Roots are desiccated or blackened, damaged by excess salt and unable to provide nutrition the plant needs to survive.
Brown leaf tips and edges indicate incorrect watering and/or fertilising. When you see this after a fertiliser application, chances are roots are taking up excess salt causing foliage to become dry and brittle.
How to Fix Fertiliser Burn
When fertiliser burn is recognized early, it can be corrected to save your plant.
Flush the Pot
Dry, brown leaf tips and margins are an early sign of fertiliser burn. Flush the plant with cool, clean water several times, allowing excess to drain away.
Hold the pot under a running faucet or allow the saucer to fill then dump it, wait a few minutes and repeat. The first rinse dissolves accumulated salts and the second cleans the potting medium. Drain thoroughly. The plant will reabsorb salts left in standing water. Prune out any severely damaged leaves and withhold feeding until new healthy foliage appears.
Tip
Municipal water sources contain chemical salts that contribute to build up. If your plant is slow to recover or it consistently develops salt deposits, try using distilled or rainwater or boil your tap water and allow it to cool 24 hours before using it for irrigation.
Repot
White deposits on soil, pot surfaces and foliage can be fixed by repotting. Start by flushing several times with clean water to thoroughly rinse the roots. Then move the plant to a fresh pot with a new potting medium. If there are no other signs of fertiliser burn, resume a normal feeding schedule with fertiliser diluted to half strength.
Tip
When you see white crust on the soil surface, you can scrape off the top inch and replace it with fresh potting mix. If salts have built up on the pot surface or stems and leaves, it’s better to go ahead and repot.
Prune Damaged Roots
Stunting and wilting indicate damaged roots, which eventually rot and cause your plant to die. Remove the plant from its pot and shake off excess potting medium. Inspect roots and prune out any dried up or discoloured. Prune partially damaged roots back to healthy tissue. Gently rinse with cool, clean water and repot using fresh material. Resume a regular watering schedule but withhold fertiliser, giving the plant plenty of time to recover.
When new buds and leaves appear, consider reducing your fertilisation schedule or dilute the amount. If new growth fails to appear after about a month, the plant has likely succumbed to root rot and should be disposed of.
Preventing Fertiliser Burn
Most houseplants are tropical in origin but that doesn’t mean they all need the same amount of nutrients to stay healthy. Read & learn about each specific plant’s requirements.
- Start out with a diluted formula and watch for signs of nutrient deficiency. It’s easier to increase feeding than to try to fix a damaged plant.
- Water first before adding fertiliser. Moist roots take up nutrients more efficiently.
- Use a water-soluble, balanced houseplant formula, unless a specific fertiliser, like orchid food, is recommended.
- Avoid wetting leaves and stems with fertiliser.
- Flush pots regularly every three or four months by running cool, clean water through several times.
- Fertilise plants at the beginning of the growing season, then stop fertilising during winter months to give the plant a natural rest period.
- Signs of fertiliser burn include dry, brown leaf tips and edges. White crust or deposits on soil, pot surfaces, leaves and stems indicate build up of harmful salts. Stunted growth and sudden wilting are more serious symptoms.
- What happens if you give a plant too much fertiliser?
- All fertilisers contain salts that can build up to harmful levels causing plant parts to dry up and die. This can happen if the fertiliser is too strong, the wrong type, or is applied too often. Irrigate the plant right away when you see signs of fertiliser burn. When caught early, you can correct the problem and save the plant.
Happy Gardening
Rama Tyagi
tyagirama1@gmail.com
Vatsala, the oldest elephant in Asia dies in Panna Forest Reserve, MP

For decades, Vatsala was a gentle leader and embodiment of grace. On Tuesday, Panna Tiger Reserve’s elephant camp matriarch took her last breath.
Estimated to be more than 100 years old, Vatsala died in the Hinouta range of the Panna Tiger Reserve in Madhya Pradesh. Forest officials confirmed she died around noon near Khairaiya Nala. Due to a broken toenail in her front leg, she had been resting for some time, unable to move much.
Despite daily care, including special porridge meals and health checks from veterinarians, the ageing elephant’s condition worsened. She had lost her eyesight and could no longer patrol with other elephants. Staff had been helping her bathe each day at the Nala and monitored her closely.
Making a Moss Grow Cube
The power of Plant Growth Regulators
Unlocking the Power of Plant Growth Regulators (PGRs) in Sustainable Agriculture
In the dynamic world of agriculture, science continues to unlock powerful tools that can transform gardening practices. One such advancement is the use of Plant Growth Regulators (PGRs)—small but mighty compounds that play a crucial role in plant development and productivity. From stimulating root growth to enhancing fruit ripening, PGRs serve as the invisible architects of plant life.
Here’s the revised version of the additional lines with specific reference to Cactus and Adeniums:
In home gardening, especially with succulents like Cactus and flowering plants like Adeniums, Plant Growth Regulators (PGRs) play a valuable role. Auxins help in rooting cactus cuttings more effectively, while Cytokinins can promote multiple branch formation in Adeniums, leading to fuller, more attractive plants. Controlled use of Gibberellins can also enhance flowering in Adeniums. For gardeners, understanding and using PGRs wisely can lead to healthier growth, more blooms, and improved plant structure even in small urban spaces.
Common Root Hormones we buy from the market contain these .There are many combos available so before buying choose which is applicable to your plants.
🌱 What Are Plant Growth Regulators (PGRs)?
Plant Growth Regulators are organic compounds, either natural or synthetic, that influence the physiological processes of plants. Unlike nutrients, which serve as food, PGRs act like hormones—directing growth, development, and responses to environmental stress. Their role is critical across all growth stages: germination, flowering, fruiting, maturation, and even senescence (aging).
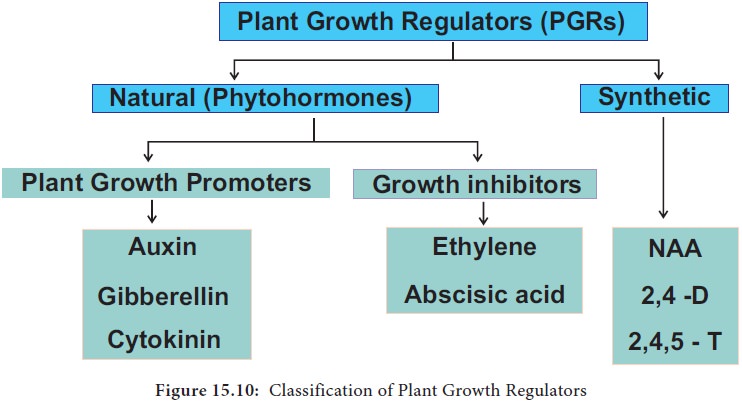
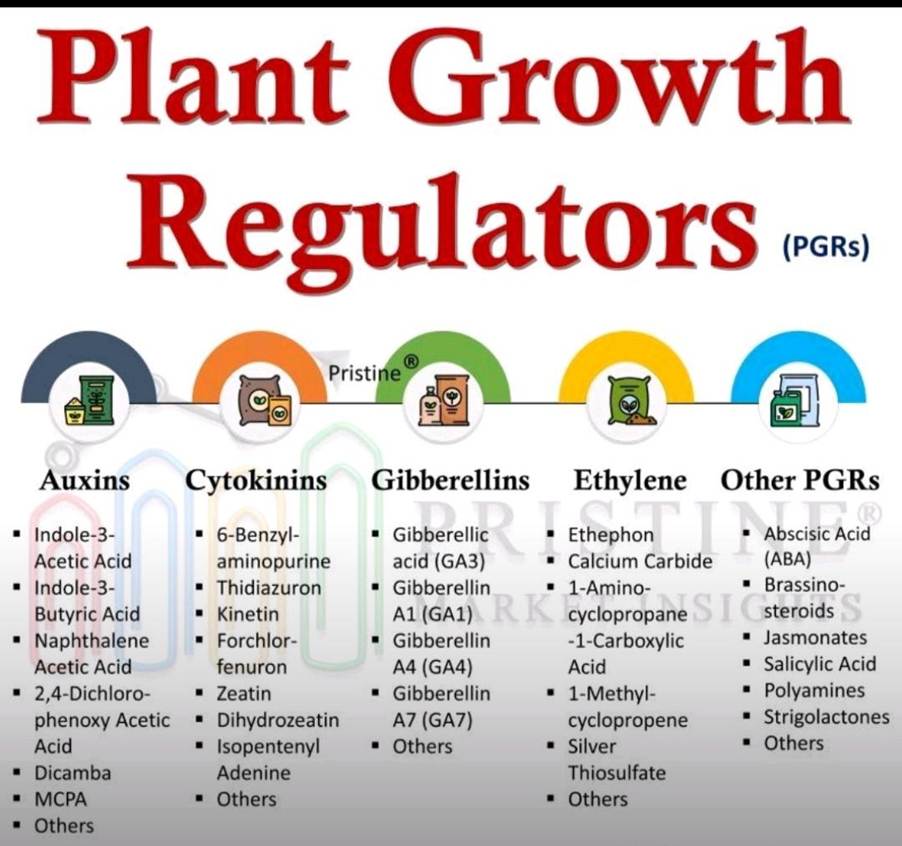
🌾 Categories of PGRs and Their Functions
- Auxins
- Key Compounds: Indole-3-Acetic Acid, Indole-3-Butyric Acid, Naphthalene Acetic Acid (NAA), Dicamba
- Functions: Stimulate cell elongation, root initiation in cuttings, and prevent premature fruit drop. Auxins are vital for directional growth (phototropism and gravitropism).
- Cytokinis
- Key Compounds: Kinetin, Zeatin, Benzylaminopurine, Thidiazuron
- Functions: Promote cell division and shoot formation. They delay leaf senescence and are essential in tissue culture and shoot regeneration.
- Gibberellins
- Key Compounds: Gibberellic Acid (GA3), GA1, GA4, GA7
- Functions: Break seed dormancy, stimulate stem elongation, enhance flowering and fruit enlargement.
- Ethylene
- Key Compounds: Ethephon, Calcium Carbide
- Functions: Regulates fruit ripening, flower induction (in pineapples), and leaf abscission. Ethylene is often used for synchronized ripening of fruits like bananas and mangoes.
- Other PGRs
- Key Compounds: Abscisic Acid (ABA), Brassinosteroids, Jasmonates, Salicylic Acid
- Functions: These regulators manage stress responses, stomatal closure, immunity, and seed dormancy.
🌿 Why Are PGRs Important?
- Enhanced Yield: By applying the right PGR at the right time, farmers can achieve more uniform flowering and fruiting, leading to improved yield and quality.
- Stress Tolerance: Some PGRs help plants cope with abiotic stresses like drought, salinity, and heat.
- Crop Management: They assist in managing growth patterns, making mechanized harvesting easier and more efficient.
- Tissue Culture & Propagation: Essential for micropropagation, especially in commercial horticulture and forestry.
🌍 Towards Sustainable Farming
Understanding and utilizing PGRs can significantly contribute to sustainable agriculture. By reducing the dependence on chemical fertilizers and improving plant resilience, PGRs promote ecological balance and long-term productivity. Scientific farming not only boosts food production but also ensures environmental sustainability and farmer profitability.
🌾 Conclusion
As we move towards climate-smart and resource-efficient agriculture, Plant Growth Regulators stand out as key enablers of innovation. Whether you’re a smallholder farmer or a large-scale grower, mastering the use of PGRs can lead to healthier crops, better yields, and a greener planet.
Let us commit to continued learning, experimentation, and responsible use of PGRs to secure a thriving future for agriculture.
Guava Care During Monsoon
Protecting Your Fruit from Worm Infestation
Guava (Psidium guajava), a beloved tropical fruit, is a hardy and productive tree known for its nutritional richness. However, the monsoon season, while crucial for fruit development, also brings a surge in pest problems—especially fruit flies and worms that damage the ripening fruit. If not managed properly, these infestations can ruin a large part of your harvest.
🌧️ Why Monsoon Is a Risky Season for Guava
● High humidity creates ideal breeding grounds for fruit flies (Bactrocera spp.), whose larvae (maggots) are the most common “worms” found inside guavas.
● Continuous rain and waterlogging may weaken plant immunity.
● Delayed harvesting during this season increases the risk of infestation.

🪰 Understanding the Worm Problem
What we commonly refer to as “worms” in guava are usually fruit fly maggots. Female flies lay eggs under the skin of semi-ripe guavas. These hatch into larvae and burrow into the fruit, making it unfit for consumption.
✅ Preventive Measures and Care Tips
- Timely Harvesting
● Harvest guavas as soon as they start ripening, especially during monsoon.
● Do not allow fruits to overripen on the tree, as they become more susceptible to fly attacks. - Field Sanitation
● Collect and destroy fallen or infested fruits regularly to break the fruit fly lifecycle.
● Bury damaged fruits at least 1.5 feet deep or compost them using EM (Effective Microorganisms) to kill larvae. - Fruit Bagging
● Cover developing guavas (when they are lime-sized) with paper or cloth bags to prevent fruit fly access.
● Use butter paper bags or fine mesh bags, which also protect from fungal infections. - Organic Sprays
● Spray neem oil (5 ml/litre) mixed with a mild soap solution every 7–10 days during monsoon.
● Use a mixture of buttermilk and turmeric (1:1 ratio) as a natural deterrent. - Protein Baits & Traps
● Set up fruit fly traps using:
○ A plastic bottle with a protein bait (like jaggery + yeast + water) and a few drops of insecticide (malathion or neem-based).
○ Commercial lures such as methyl eugenol traps to attract and kill male flies. - Use of Wood Ash or Lime
● Sprinkle wood ash or slaked lime around the base of the tree to discourage larvae from pupating in the soil.
🌱 Guava Tree Care During Monsoon
● Prune dead or diseased branches before the monsoon for better airflow.
● Ensure good drainage around the base to prevent root rot.
● Apply well-rotted organic compost and a light dose of potassium-rich fertilizer for fruit development.
● Avoid overwatering—guava trees dislike waterlogged conditions.
🧴 Recommended Natural Pesticide Recipe (Homemade)
Ingredients:
● Neem oil – 50 ml
● Soapnut (Reetha) solution – 50 ml
● Water – 1 litre
Usage: Mix well and spray on leaves and fruits every 7–10 days. Safe and effective.
🏆 Bonus Tip: Companion Planting
Plant marigold or basil (tulsi) nearby—these act as natural repellents for pests and improve pollination.
✨ Conclusion
With timely action and a focus on organic preventive methods, guava growers can enjoy a healthy, worm-free harvest even during the challenging monsoon season. Clean surroundings, covered fruits, and natural repellents are your best allies. Let this monsoon bring nourishment, not nuisance, to your guava orchard!
Happy Gardening
Rama Tyagi
CREATING A BUTTERFLY CORNER
A Butterfly Corner in a park adds color, life, and educational value, while supporting biodiversity and pollinators. Here’s a complete plan with ideas for cutouts, plants, layout, and engagement:
🌼 BUTTERFLY CORNER PLAN 🌼: 🦋 “Where wings whisper stories of flowers” 🦋
✅ 1. LOCATION & LAYOUT
Sunny Spot: Butterflies need sun to regulate body temperature. Sheltered from wind: Prefer a calm corner near a hedge or wall. Curved Path or Spiral Bed: Natural flowing shapes are inviting.
Layout Ideas:
- Central butterfly-shaped flower bed
- Border with stones or small picket fence
- Stepping stones or wooden logs as a path
- A few flat rocks where butterflies can bask in the sun
🌸 2. PLANTS TO ATTRACT BUTTERFLIES
🌼 Nectar Plants (for adult butterflies):
Plant Name / Hindi Name/ Flower Season
- Lantana camara/ पंचफूली / राईमुनिया/ Year-round
- Zinnia/ झिननिया/ Summer–Autumn
- Marigold (Tagetes) /गेंदा /Year-round
- Pentas/ पेंटास /Spring–Autumn
- Butterfly Bush (Buddleia) /तितली झाड़ी/ Spring–Summer
- Cosmos /कॉसमॉस/ Summer–Autumn
- Verbena/ वर्बेना /Summer
- Hibiscus /गुड़हल/ Year-round
🌱 Host Plants (for laying eggs & caterpillars):
Plant Name/ Supports /Notes
- Curry Leaf (Murraya koenigii)/ Common Mormon/ Edible plant too
- Lemon/Orange (Citrus)/ Swallowtails/ Adds fragrance
- Calotropis (Aak) /Plain Tiger/ Hardy
- Milkweed (Asclepias)/ Monarch, Danaid/ Eggfly Essential
- Passionflower (Passiflora) Glassy Tiger/ Attractive climber
- Cassia alata /Mottled Emigrant/ Tall and showy
🎨 3. CUTOUT IDEAS
🦋 Butterfly Cutouts (Waterproof & Vibrant):
- Material: Acrylic sheets, thick sunboard, or painted wood
- Height: 3 ft to 5 ft
- Style:
- Realistic native butterflies (e.g., Blue Mormon, Common Jezebel)
- Fun cartoon-style for kids
- Silhouettes with cutout wing patterns
🌿 Plant Signage:
Small info boards:
- Plant Name (English + Hindi)
- Who feeds on it: “Host plant for Blue Tiger Butterfly”
- QR Code linking to more info
🎭 Educational Standee / Board:
- “Life Cycle of a Butterfly” (Egg → Caterpillar → Chrysalis → Butterfly)
- “How to identify butterflies”
- “Do’s and Don’ts in a Butterfly Garden”
🧒 4. INTERACTIVE ELEMENTS
- Butterfly selfie frame
- Coloring corner (on weekends)
- Butterfly observation chart (board to mark spotted species)
- Binoculars hanging on a stand
🚫 5. DON’TS
- Avoid chemical fertilizers and pesticides
- Don’t over-trim or disturb caterpillars
- No loud noises or artificial lights at night
🌱 6. ADDITIONAL TIPS
- Add a mud puddling area (a shallow dish with sand, salt, and water)
- Grow native grasses and herbs nearby
- Use drip irrigation to avoid waterlogging
GOOD TO HAVE:
- A printable butterfly species chart (native to your region)
- Signboard templates
- Layout sketch (top view) of the butterfly corner
[Printable Garden Plan]
Create a No-Fuss Bird & Butterfly Garden
Plant List
1.) Catmint 5.) Anise Hyssop 9.) New England Aster
2.) Sedum 6.) Bee Balm 10.) Joe Pye Weed
3.) Butterfly Weed 7.) Meadow Blazing Star 11.) Butterfly Bush
4.) Black Eyed Susan 8.) Purple Coneflower
Step-by-Step Guide to Creating a Bird & Butterfly Garden
Attracting birds and butterflies to your yard is a delightful way to enjoy these beautiful creatures up close while also supporting the local ecosystem. Follow this step-by-step plan to create an inviting oasis for birds and butterflies in your own backyard.
Step 1: Choose a Suitable Location ; Birds and butterflies need a mix of sunny and sheltered areas. Select a spot that receives at least 6 hours of direct sunlight per day for nectar-rich flowers, but also includes some shady
spots for shelter from strong winds and predators.
Step 2: Prepare the Soil ; Remove grass and weeds, and loosen the soil to a depth of 12-18 inches. Mix in compost to enrich the soil and improve Drainage. Good soil health is essential for strong plant growth.
Step 3: Plan Your Design: Sketch out your garden layout, keeping taller plants like Joe Pye Weed and Hollyhock in the back, and shorter ones like Catmint and Salvia in front. Group plants with similar colors together in clumps for visual impact. Include flat stones for butterflies to bask on and a
birdbath for a water source.
Step 4: Select and Purchase Plants ; Choose a variety of native flowers, shrubs, and grasses that provide nectar for adult butterflies, food for caterpillars, seeds for birds, and shelter. Some top plant choices from the
provided plan include:
- Butterfly Weed (Asclepias tuberosa)
- Purple Coneflower (Echinacea purpurea)
- Black-Eyed Susan (Rudbeckia fulgida)
- Aster (Symphyotrichum species)
- Goldenrod (Solidago species)
- Joe Pye Weed (Eutrochium species)
- Milkweed (Asclepias species)
- Coreopsis (Coreopsis species)
- Sedum (Sedum species)
- Catmint (Nepeta species)
- Salvia (Salvia species)
Aim for continuous bloom from spring through fall and include a mix of annuals and perennials to provide food throughout the seasons.
Step 5: Plant Your Garden
Arrange plants while still in their pots until you’re satisfied with the layout. Dig holes twice as wide as the root balls. Remove plants from pots, loosen roots, and place in holes. Fill in with soil and water well. Mulch around plants to retain moisture and suppress weeds.
Step 6: Add Finishing Touches ; Place flat stones in sunny spots for butterfly basking. Include a birdbath with shallow edges or a fountain with a gentle drip. Avoid using pesticides and herbicides which can harm birds, butterflies, and beneficial insects.
Step 7: Maintain Your Garden: Water plants regularly until established. Remove dead flower heads to encourage repeat blooming. Allow some flower heads to go to seed to provide food for birds. Leave some areas a bit untidy for shelter. Cut back plants in late fall or early spring.
With the right mix of native plants and some thoughtful design, your bird and butterfly garden will soon be buzzing and fluttering with activity. Enjoy the lively scene as you provide vital habitat for these important creatures.
(Copyright 2024: thenatureofhome.com)